Настройки и управление защитой
Доступные команды
Чтобы увидеть список всех доступных команд AdGuard, введите:
adguard-cli --help-all
Включить и отключить защиту
Включить защиту
Чтобы включить защиту, введите:
adguard-cli start
Эта команда позволяет настроить перенаправление на прокси-сервер.
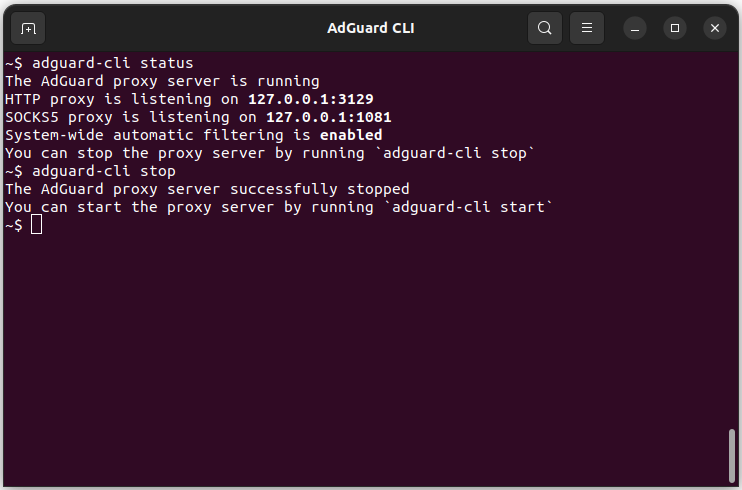
Отключить защиту
Чтобы отключить защиту, введите:
adguard-cli stop
Эта команда не только останавливает работу прокси-сервера, но и прекращает перенаправление трафика на него.
Проверить статус защиты
Чтобы просмотреть статус защиты, введите:
adguard-cli status
Перезапустить защиту
Чтобы перезапустить прокси-сервер и повторно применить настройки, введите:
adguard-cli restart
Обновления
Проверить обновления
Чтобы проверить наличие обновлений, введите:
adguard-cli check-update
Обновить AdGuard для Linux
Чтобы обновить AdGuard для Linux, введите:
adguard-cli update
Вывод скрипта обновления
Чтобы просмотреть вывод скрипта обновления, введите:
adguard-cli update -v
Настроить AdGuard для Linux
Используйте команду config для настройки AdGuard для Linux. Подкоманды:
-
show [<section-name>]: показать текущую конфигурацию вproxy.yaml(или конкретный раздел)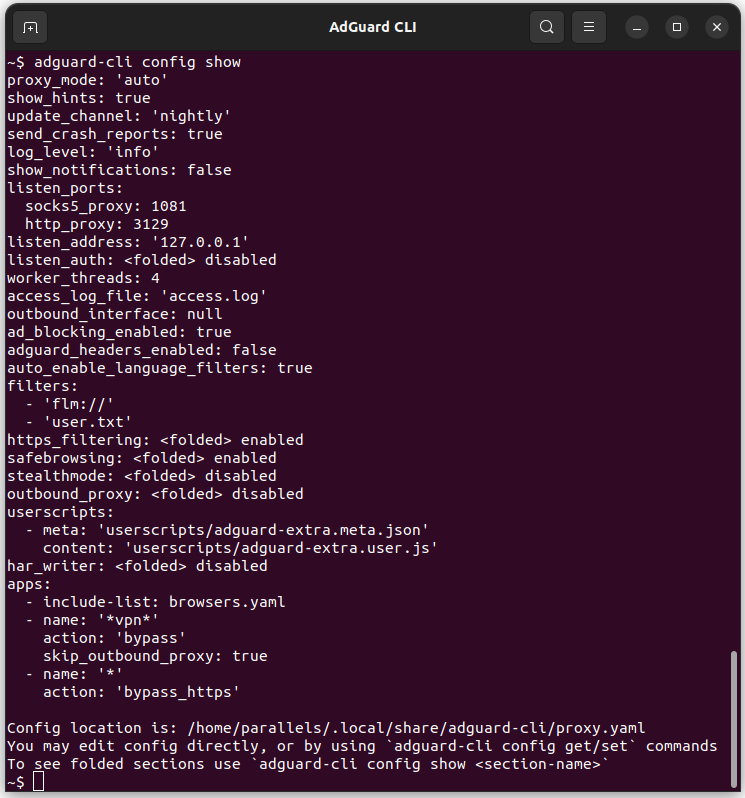
-
set <key> <value>: настроить параметр вproxy.yamllisten_ports.http_proxy: порт прослушивания HTTPproxy_mode: режим прокси-сервера (manualилиauto)
-
get <key>: получить текущий статус настройки -
list-add <key> <value> [<value>...]: добавить одно или несколько значений в настройку списка -
list-remove <key> <value>: Remove a value from a list setting -
reset <key>: Reset a setting to its default value -
reset --all: Reset all settings to their default values
The Automatic mode can only be used if the following requirements are met:
iptablesis installed and running (eithernftorlegacy)iptablessupports thenattable for both IPv4 and IPv6iptablessupports theREDIRECTandQUEUEchains for both IPv4 and IPv6- The
sudopackage is installed
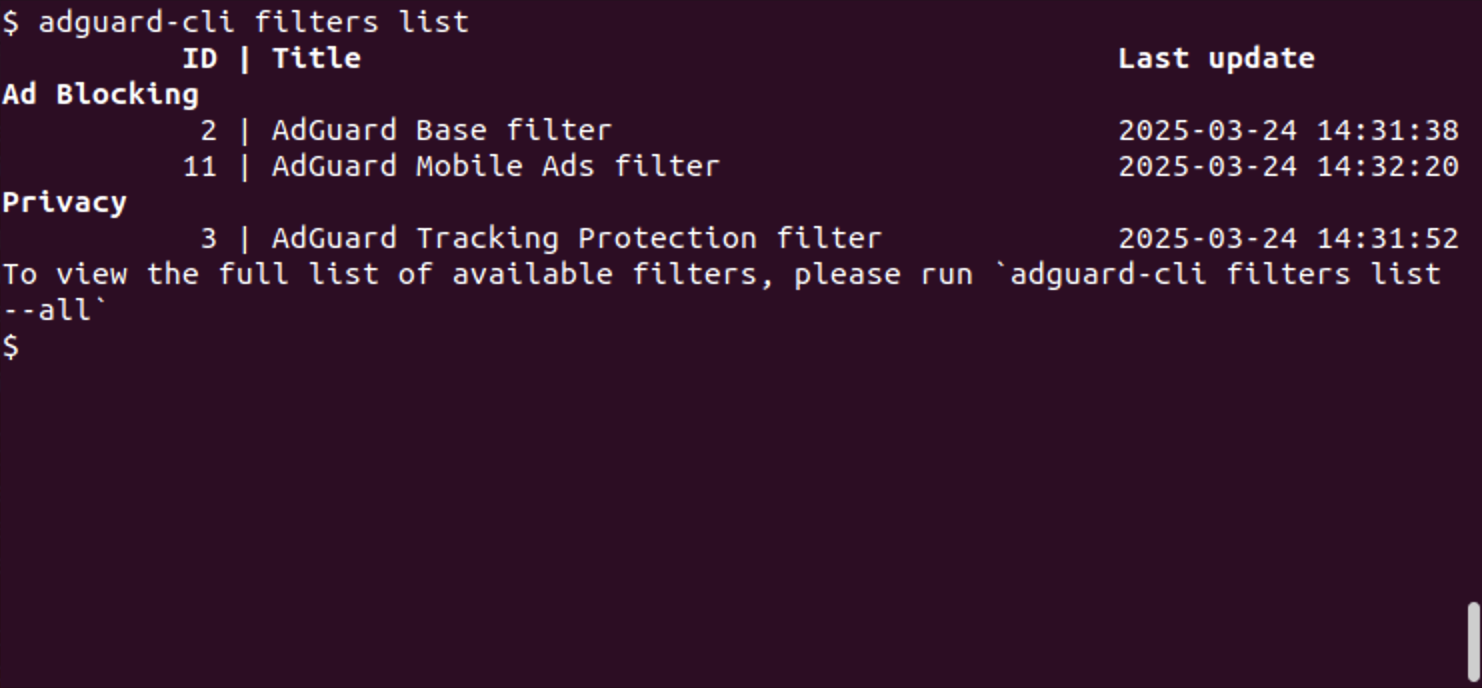
Manage filters
Use the filters command to configure AdGuard for Linux. Подкоманды:
-
list: List installed and added filters--all: View all filters
-
add: Add a built-in filter by ID or name -
install: Install a filter. Enter the URL of the filter you want to install or local file--trusted: Mark the custom filter as trusted--title: Set a custom title for the filter
-
enable: Enable a filter. Enter the name or ID of the filter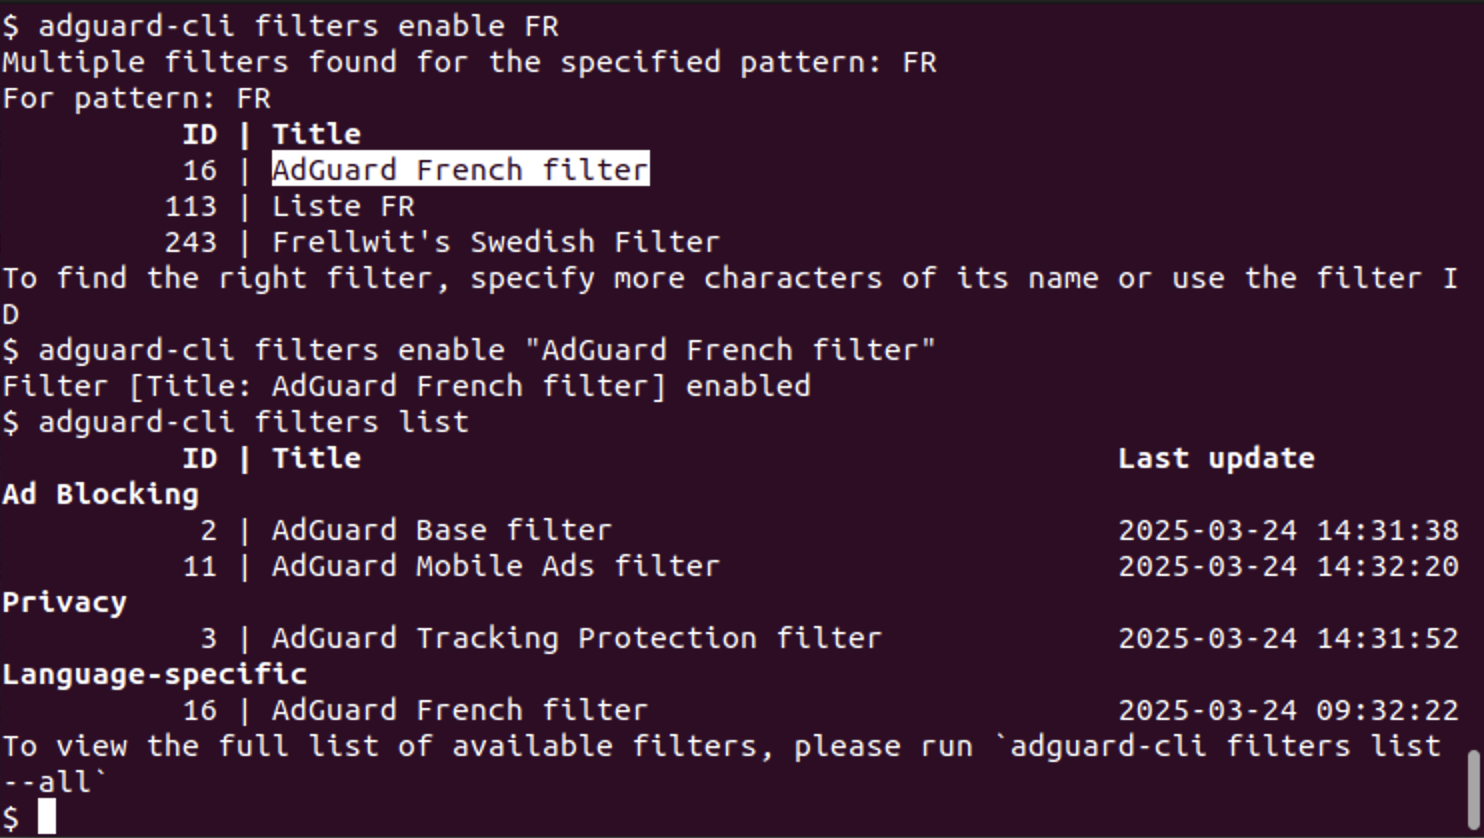
-
disable: Disable a filter. Enter the name or ID of the filter -
remove: Remove an internal or custom filter by ID -
set-trusted: Mark a custom filter as trusted or untrusted -
set-title: Set a custom title for a custom filter
Filter updates are handled by adguard-cli check-update (the filters update subcommand forwards to it).
Manage DNS filters
Use the dns filters command to manage DNS filter lists. Подкоманды:
list: List installed and added DNS filters--all: View all DNS filters
add: Add a built-in DNS filter by ID or nameinstall: Install a custom DNS filter from a URL or local file--title: Set a custom title for the filter
enable: Enable a DNS filter. Enter the name or ID of the filterdisable: Disable a DNS filter. Enter the name or ID of the filterremove: Remove a DNS filter by IDset-title: Set a custom title for a DNS filter
DNS filter updates are handled by adguard-cli check-update.
Manage userscripts
Use the userscripts command to manage userscripts. Подкоманды:
list: Show installed userscriptsinstall: Install a userscript from a URLremove: Remove a userscriptenable: Enable a userscriptdisable: Disable a userscript
Userscripts are updated by adguard-cli check-update.
Changing the proxy server listen address in manual proxy mode
By default, the proxy server listens on 127.0.0.1 — the address of the loopback network interface.
There are two ways to make the proxy server listen on a different interface:
- Run
adguard-cli config set listen_address <address>where<address>is the address to listen on. - Edit the config file directly:
- To determine the location of the config file, run
adguard-cli config show | grep "Config location". - Look for the
listen_addresskey and set its value accordingly. To listen on all available network interfaces, set the listen address to0.0.0.0or::.
- To determine the location of the config file, run
If the listen address is set to anything other than 127.0.0.1, then proxy client authentication is required. AdGuard CLI will not start unless proxy authentication is configured:
- When running
adguard-cli config set listen_address <address>where<address>is not127.0.0.1, AdGuard CLI will prompt for a username and password if proxy authentication is not already configured. - When editing the config file directly, look for the
listen_authkey. Set theenabledsub-key totrue, andusernameandpasswordto non-empty values.
Configure outbound proxy
You can configure outbound_proxy if you want AdGuard CLI to work through another proxy server.
There are two ways to configure it:
1. Configure via URL (recommended)
Instead of setting each option step by step, you can set all parameters in a single line using a URL:
adguard-cli config set outbound_proxy https://user:pass@host:port
Supported modes are HTTP, HTTPS, SOCKS4, and SOCKS5.
You can also quickly enable or disable outbound_proxy:
adguard-cli config set outbound_proxy false
Or quickly clear the settings:
adguard-cli config set outbound_proxy ""
2. Configure individual parameters
The ability to adjust specific parameters is also available:
adguard-cli config set outbound_proxy.enabled true
adguard-cli config set outbound_proxy.host localhost
adguard-cli config set outbound_proxy.port 3128
adguard-cli config set outbound_proxy.username user
adguard-cli config set outbound_proxy.password pass
Disable certificate verification for HTTPS proxies:
adguard-cli config set outbound_proxy.trust_any_certificate true
Enable SOCKS5 proxy for UDP traffic:
adguard-cli config set outbound_proxy.udp_through_socks5_enabled true
If your SOCKS5 proxy does not support UDP, connections may fail.
Per-app AdGuard CLI configuration
Users often need to enable filtering manually for certain browsers. AdGuard for Linux supports per-app configuration, allowing you to apply settings or rules individually to each application instead of system-wide.
For details, refer to the apps section in proxy.yaml.
A set of pre-configured entries for popular web browsers is included by default in browsers.yaml.
Checking the current configuration
To view the current outbound_proxy configuration, enter:
adguard-cli config show outbound_proxy
Configuring outbound_proxy via URL is available starting from AdGuard for Linux v1.1.26 nightly and v1.1 stable release.
Export and import settings
The export/import functionality allows you to backup your AdGuard CLI configuration and restore it on the same or different system. This includes filters, proxy settings, and other configuration options.
Export settings
To export current AdGuard CLI settings to a ZIP archive, use:
adguard-cli export-settings
You can specify the output path using the -o or --output flag. This can be either a specific file path or a directory:
# Export to a specific file
adguard-cli export-settings -o "/path/to/settings.zip"

# Export to a directory (archive will be created with a standard name)
adguard-cli export-settings -o "/path/to/directory"
If no output path is specified, the settings will be exported to the working directory with a standard name. After successful export, the command will display the full path where the archive was created.
Import settings
To import AdGuard CLI settings from a ZIP archive, use:
adguard-cli import-settings -i "/path/to/settings.zip"
The -i or --input flag is required and specifies the path to the settings archive to import.
Браузерный помощник AdGuard
Браузерный помощник AdGuard позволяет управлять защитой AdGuard прямо из браузера.
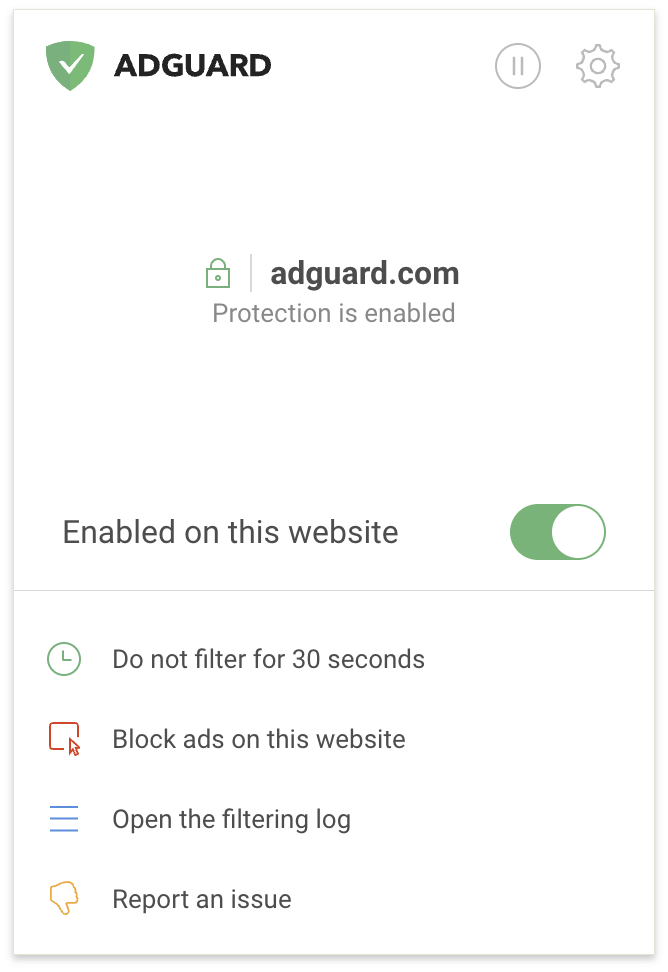
Как это работает
Браузерный помощник AdGuard — это расширение для браузера. It allows you to quickly manage AdGuard for Linux:
- Enable or disable protection for a specific website (the toggle under the website name)
- Приостановить защиту на 30 секунд
- Отключить защиту (значок паузы в правом верхнем углу)
- Блокировка рекламы вручную
- Сообщить о неправильной блокировке
- Manage HTTPS filtering (the lock icon next to the website name)
Как установить
To install Native Messaging manifests for browser integration, use:
adguard-cli install-browser-integration
To uninstall the manifests, use:
adguard-cli install-browser-integration --uninstall
Install AdGuard Browser Assistant extension:
- Откройте страницу Помощника.
- Под названием вашего браузера выберите Установить.
- Установите Помощник из магазина расширений вашего браузера.
Support for AdGuard Browser Assistant is available starting from AdGuard for Linux v1.4.