Announcing AGLint
Any ad blocker’s work is defined by the so-called filter lists so it’s important to understand what they are and how they are made — you’ll find the explanation below. Today, we want to introduce a new tool that is supposed to make it easier to develop filter lists, and we want to share this tool with the whole ad-blocking community.
To delve deeper into it, check out our articles. We've covered in detail what filters are, how ad blocking works based on them and how filter development is threatened by Manifest v3.
What are filter lists and filtering rules?
In a nutshell, filter lists are basically text files where each line is a filtering rule. Filtering rules define what an ad blocker should do, they are interpreted and applied on different stages of a web page lifecycle. This is true for almost every ad blocker, moreover, filtering rules syntax is mostly shared between different ad blockers so you can use the same lists in AdGuard, Adblock Plus, and uBlock Origin.
A rule is a line of code written with a special syntax. It might look like this:
||example.org^
Or like this:
example.org#%#//scriptlet("abort-on-property-read", "wpsite_clickable_data")
There are hundreds of different filtering options and we can’t list them all here, but we hope it is enough to get the general idea.
With time, filtering rules syntax evolved and nowadays its complexity is comparable with a programming language. Just take a look at the documentation, the volume is huge. Maybe it’s time to write a book, huh?
Who develops filter lists?
Most filters are developed and maintained by volunteers. Some make them for one particular blocker, but the majority aim to support all popular blockers at once. But filters are raw material. AdGuard team members not only develop and maintain filters, they also coordinate community activity, process user feedback, collect and analyze filter usage statistics, and monitor the performance of third-party filters. They also make tough choices that affect millions of users, such as whether to disable a filter as obsolete or not. All this requires expertise and competence, including an understanding of how the Internet works and what technology trends exist.
What AdGuard does to support the community
We do our best to support the community of filter developers. For example, AdGuard develops its own set of filter lists, AdGuard Filters, and they are among the most actively developed filter lists out there. Also, we once made a plugin for the MS Visual Studio Code editor that provides syntax highlighting and makes it easier to develop new filters. That plugin served as the basis for adding filtering rules syntax support on Github.
And today we want to introduce a new tool that we believe will over time improve the quality of filters and make the developers’ work easier — AGLint. We made this utility for filter validation together with David Tota, and the post was co-authored with him.
Introducing AGLint
As we said in the beginning, filtering rules syntax is now as complicated as a programming language. On the one hand, more complicated equals more power and flexibility to ad blockers, allowing them to handle more complicated ads and tracking. Unfortunately, there is another side to it. When dealing with this level of complexity, it is very easy to make a mistake, and the results of such a mistake will be felt by millions of people.
How can we improve the situation and help people avoid mistakes? One of the ways that helps with it is “static analysis.” A special program inspects the code and looks for the most common mistakes in it. Programs of that class are usually called linters and that’s what AGLint is.
How to use it
In this section we go over how to install AGLint as a CLI tool, and give some examples of the main use cases. By the very nature of it, the explanation will be extremely technical and will require significant background knowledge. If you aren’t sure you’re up to the challenge, feel free to skip over it.
Pre-requisites
First of all, please make sure you’ve installed at least Node.js v14 or higher, the latest LTS version is recommended. You can check your Node.js version by running the following command:
node -v
If you don’t have Node.js installed or if you have an older version, you can download the most recent one from the official website.
Node.js comes with NPM (Node Package Manager) by default. If you prefer Yarn (Yarn Package Manager), you can install it by running the following command:
npm install -g yarn
Installing AGLint
After you’ve installed Node.js and NPM / Yarn, you can install AGLint by running the following command in the root directory of your project:
npm install @adguard/aglint
or if you prefer Yarn:
yarn add @adguard/aglint
That’s it! You can now use the CLI tool to lint your filter list.
Running AGLint
Before you run AGLint, you need to create a configuration file. It can be either a YAML or JSON file. The configuration file should be named .aglintrc.yml or .aglintrc.json respectively. This can be done manually or by running the following command in the root directory of your project:
aglint init
Now you can run the linter to check your filter list(s). To do that, please run the following command in the root directory of your project:
npx aglint
or
yarn aglint
The linter will scan your project and print the results to the console. If there are any errors, the linter will exit with a non-zero exit code. In this case, you can use the exit code to determine whether the linter has passed or failed. For example, you can use it in your CI/CD pipeline.
AGLint can also report warnings, but if there are no errors in the report, warnings by themselves don’t indicate a non-zero exit code, as they are not critical. You can ignore them if you want, but we recommend you take a look at these messages and, if possible, consider fixing/changing your filtering rules according to them.
If you are familiar with ESLint, you may find it very easy to use AGLint. It has a similar CLI interface and it supports the same config ways.
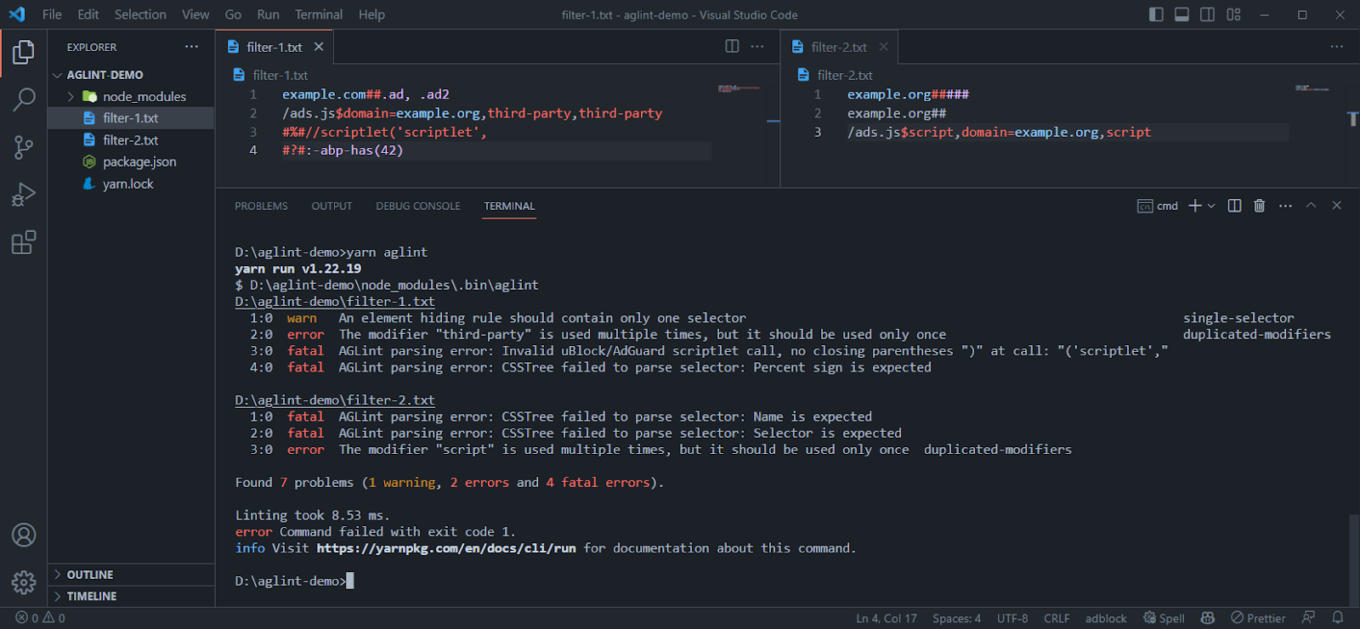
Linter CLI in action
Linting specific file(s)
You can lint a specific file path(s) by passing them as arguments:
npx aglint path/to/file.txt path/to/another/file.txt
or
yarn aglint path/to/file.txt path/to/another/file.txt
Examples
If you try to lint the following filter list:
! Title: Example filter list
example.com##.#banner
You will get the following output:
1:0 fatal AGLint parsing error: CSSTree failed to parse selector: Identifier is expected
The linter has found a fatal error. It means that the linter cannot parse the actual filtering rule. The problem is that the selector is invalid. The selector should start with a dot, which is a class selector marker, but it is followed by an ID selector marker instead of the identifier itself. The correct selector should be example.com##.banner or example.com###banner, but not .#.
Note: this is a special kind of error. It is generated not by a specific linter rule but by the linter engine itself during the parsing of the filtering rule, before calling any linter rule to validate it. If an ad-blocking rule cannot be parsed, the linter throws a fatal error on that line, as it cannot parse the ad-blocking rule to an AST (Abstract Syntax Tree). And without the AST the linter cannot check the filtering rule with the linting rules, as they basically only understand the AST. However, this is not a breaking error, AGLint will continue checking the rest of the filter list.
Let’s look at another type of mistake. If you try passing the following filter list to AGLint:
/ads.js^$script,third-party,script
You will get the following output:
1:0 error The modifier "script" is used multiple times, but it should be used only once duplicated-modifiers
The linter has found an error (not a fatal one). This means that the filter rule is parseable (i.e. syntactically valid), but semantically invalid. The problem is that the script modifier is used multiple times when it should only be used once. The correct filter rule should be /ads.js^$script,third-party or /ads.js^$third-party,script.
This error is generated by the duplicated-modifiers rule. You can find the list of all linter rules in the Rules section.
And finally, let’s look at an example of warnings:
example.com##.ad1, .ad2
You will get the following output:
1:0 warn An element hiding rule should contain only one selector single-selector
The linter has found a warning. This means that the filtering rule is syntactically and semantically valid but contains some contraindicated practice. In this case, the problem is that the element hiding rule contains several selectors which is perfectly valid but not recommended. Writing two selectors in separate rules makes the code of the filter list cleaner and more transparent, which also reduces the possibility of errors by increasing maintainability.
Note: single-selector is not a part of the recommended ruleset, so you need to enable it manually in your config file by adding it to the rules section:
rules:
  single-selector: warn
Inline config comments
Like ESLint, AGLint also supports inline config comments. You can use them to disable or enable specific rules for a specific line or block of code. For example, if you don’t want to use the duplicated-modifiers rule for the following ad-blocking rule, you can disable it by adding the following comment:
! aglint-disable-next-line duplicated-modifiers
||example.com^$third-party,third-party
In this case no error is generated for the given line because of the “duplicated-modifiers” rule.
You can also disable a linter rule for a specific block of code:
! aglint-disable duplicated-modifiers
||example.com^$third-party,third-party
/ads.js^$script,script
! aglint-enable duplicated-modifiers
Or you can disable linting completely for a specific line or code block:
! aglint-disable-next-line
||example.com^$third-party,third-party
! aglint-disable
||example.com^$third-party,third-party
/ads.js^$script,script
! Syntax error will be ignored here since linting is disabled
example.com##.#banner
! aglint-enable
! AGLint enabled from this point again
In this case the given line / block is skipped completely, not even parsing errors are generated in the report for these ad-blocking rules.
You can find the list of all available config comments in the Config comments section.
Ignoring paths
You can ignore specific paths by adding them to the .aglintignore file. The .aglintignore file is a text file with a list of paths to ignore. The paths can be either absolute or relative to the root directory of your project. It works the same way as .gitignore / .eslintignore files.
On top of that, linter will ignore some problematic paths by default. For example, it will ignore node_modules directories.
You can find the list of all default ignored paths in the Ignored paths section.
Config file
Configuration is an essential part of AGLint and required to run it. If you don’t have a config file, AGLint will throw an error before starting the linting process. You can generate a config file by running the following command:
aglint init
or you can create it manually by adding a .aglintrc.yaml file to the root directory of your project with the following content:
# This is a root config file
root: true

# Enable recommended rules
extends:
  - aglint:recommended
The configuration file is a JSON / YAML file named .aglintrc.yaml, .aglintrc.yml, .aglintrc.json or .aglintrc (JSON). We recommend the YAML format as it is cleaner and supports comments.
AGLint config searcher works the same way as ESLint. It checks the current directory for a config file and if it doesn’t find one, or if the config file doesn’t contain the root: true property, it will go up one level and check again. It will continue doing this until it either finds a config file with the root: true property or reaches the user’s home directory. If no config file is found at all, an error will be thrown.
One directory can have only one configuration file. If you have multiple configuration files within the same directory, AGLint will throw an error during scanning and the entire linting process will be aborted due to the configuration inconsistency.
It is also essential that the contents of the config file are valid (i.e. match the config schema), otherwise an error will also be thrown, since an invalid config file cannot be interpreted.
We recommended adding root: true to the config file in the root directory of your project to avoid any confusion, since this way you can prevent AGLint from searching for a config file in parent directories, outside of your project.
Customizing the config file
You can customize AGLint’s behavior by editing the configuration file. Let’s have a quick look at an example configuration. If you want to disable the “duplicated-modifiers” linter rule, you can do it by using the following config:
# This is a root config file
root: true

# Enable recommended rules (duplicated-modifiers is enabled here)
extends:
  - aglint:recommended

# You can override the previously extended rulesets here
# (changing rule parameters, disabling rules, etc.)
rules:
  duplicated-modifiers: off
or if you prefer JSON:
{
  "root": true,
  "extends": ["aglint:recommended"],
  "rules": {
    "duplicated-modifiers": "off"
  }
}
The CLI will automatically take this file into account during the scanning.
You can find the list of all available configuration options in the Configuration section.
Visual Studio Code integration
Since 2017 we have a VS Code extension available on the Visual Studio Marketplace. So far, we have only used it for syntax highlighting, but we decided to add AGLint to it so that you can get the linter results directly in the editor.
Currently we have bundled the linter with the plugin, so you don’t need to install it separately to use it. However, it is important to note that if the project also uses the CLI version installed as an NPM package, the linter results may be slightly different if the version number is different between the NPM-package AGLint and the VSCode-integrated AGLint. We plan to solve this problem so that if the VS Code extension detects the installed AGLint package, it will disable the built-in version.
In terms of functionality, VS Code plugin works exactly as described in the previous chapter, since the same engine has been integrated into the VS Code plugin.
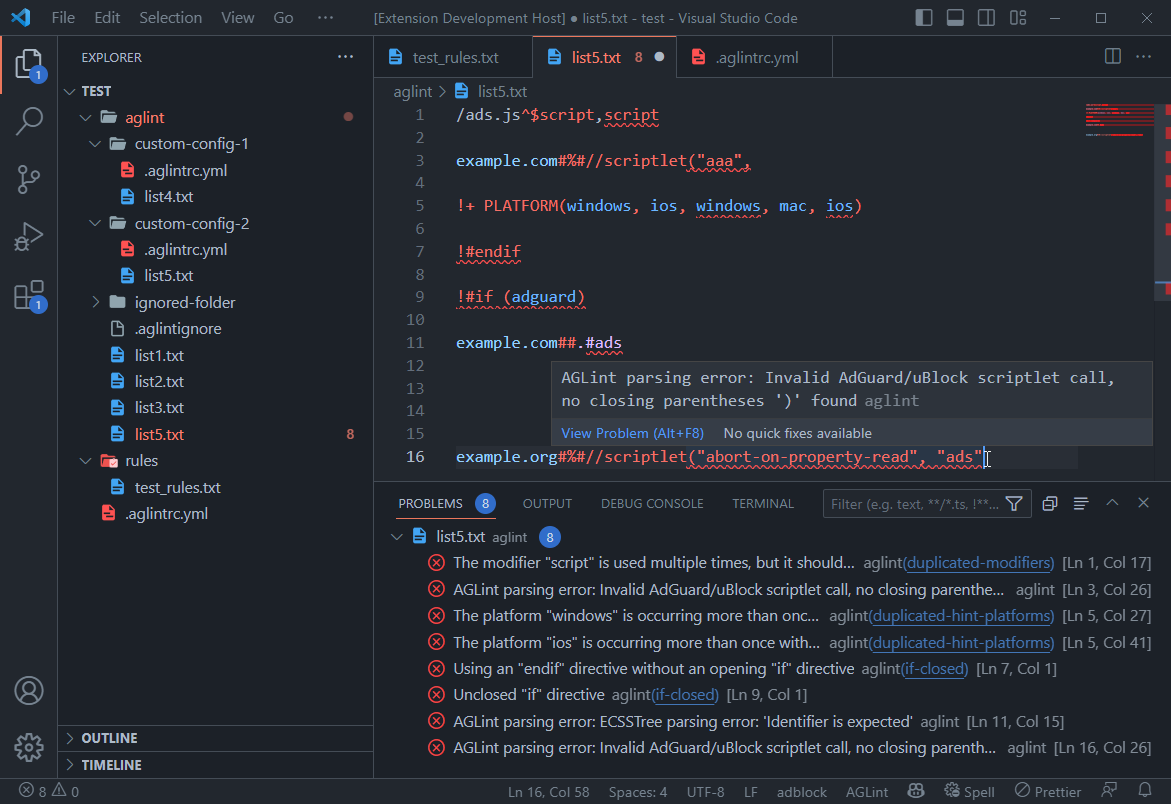
Integrated linter in action
The plugin mainly focuses on detecting errors, but code completion, fix suggestions, and more advanced syntax highlighting are also on the roadmap. So stay tuned, new features will keep coming!
If you are developing ad-blocking filter lists, we highly recommend using this extension, as we believe it can help you a lot in your work. It also results in better quality filter lists, which is in everyone’s interest.
We need your feedback
Your feedback can help us improve the linter we’ve been working on. If you come across any issues or have any suggestions, we would greatly appreciate it if you could share them with us. You can do this by creating an issue or by opening a discussion on our GitHub repository.
We welcome any contributions to the linter, and if you’re interested in adding a new rule, you can create a pull request on the same repository. Additionally, contributing to AdGuard projects can come with various rewards. You can learn more about it on the contribution page.
Thank you in advance for your help and support!