How to set up your own proxy and use it with AdGuard

In our day and age, it is becoming increasingly important to have access to any online resources that you need, at any time. This is not always convenient or even possible at all — take such example as using a network with overly restrictive firewall. What will help you be 100% sure you can access any website is setting up your own proxy. Not to mention proxy will hide your IP and let you access geo-blocked websites.

In this article, we will walk together all the way from renting our own server to configuring proxy on a mobile device or in a browser.

Renting your own server

For starters, we'll need to rent a server. You can choose any web hosting service you prefer, I will be using Vultr as an example.

I emphasize that I don't try to advertise or distinguish this service, it was only chosen as an example. Among other possible solutions are HostGator, 1&1, Cloudways, Bytemark, Digital Ocean and many, many more.

Alright, let's get to it. I start by opening vultr.com and signing up there ("Create Account" button in the top right corner).
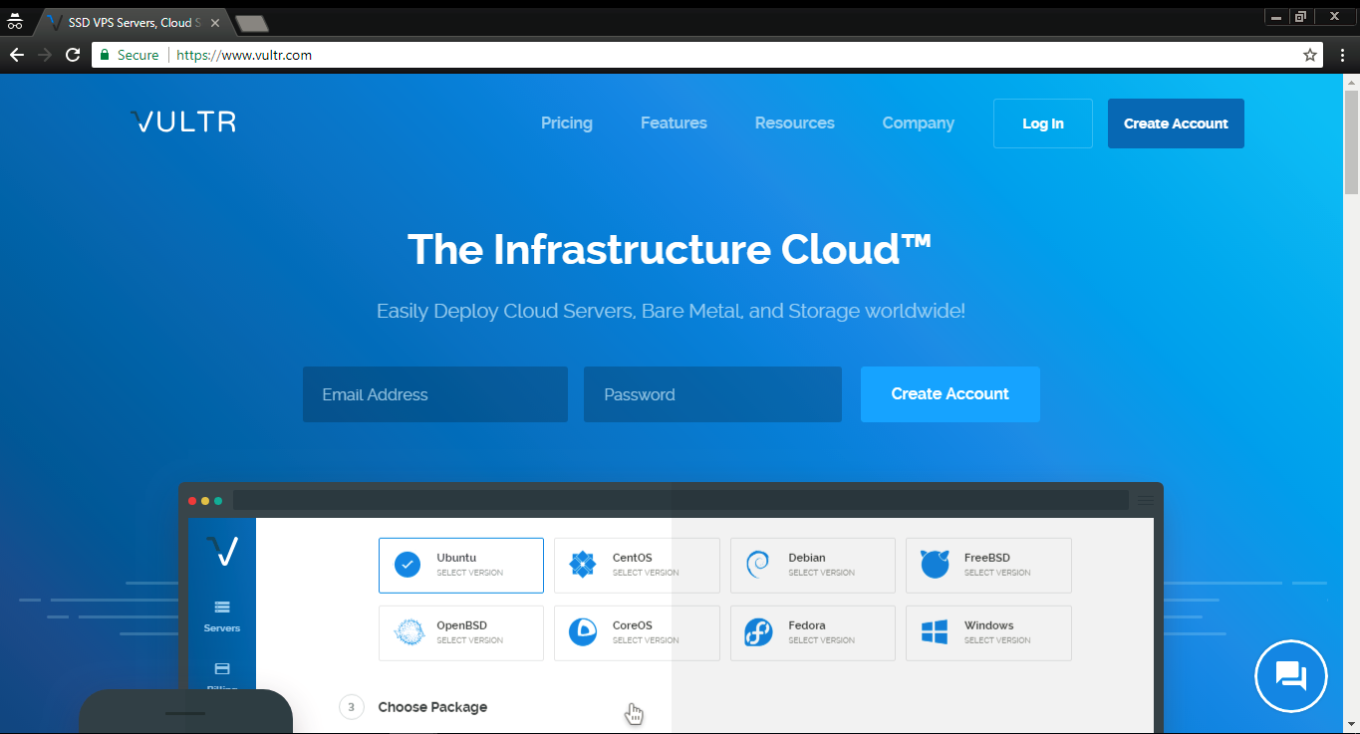
If you did the same, you'll receive an email with a link to confirm your registration. Once you do it and log in, you'll be asked to choose a payment method. I selected Credit card, but you are free to use any other, obviously.
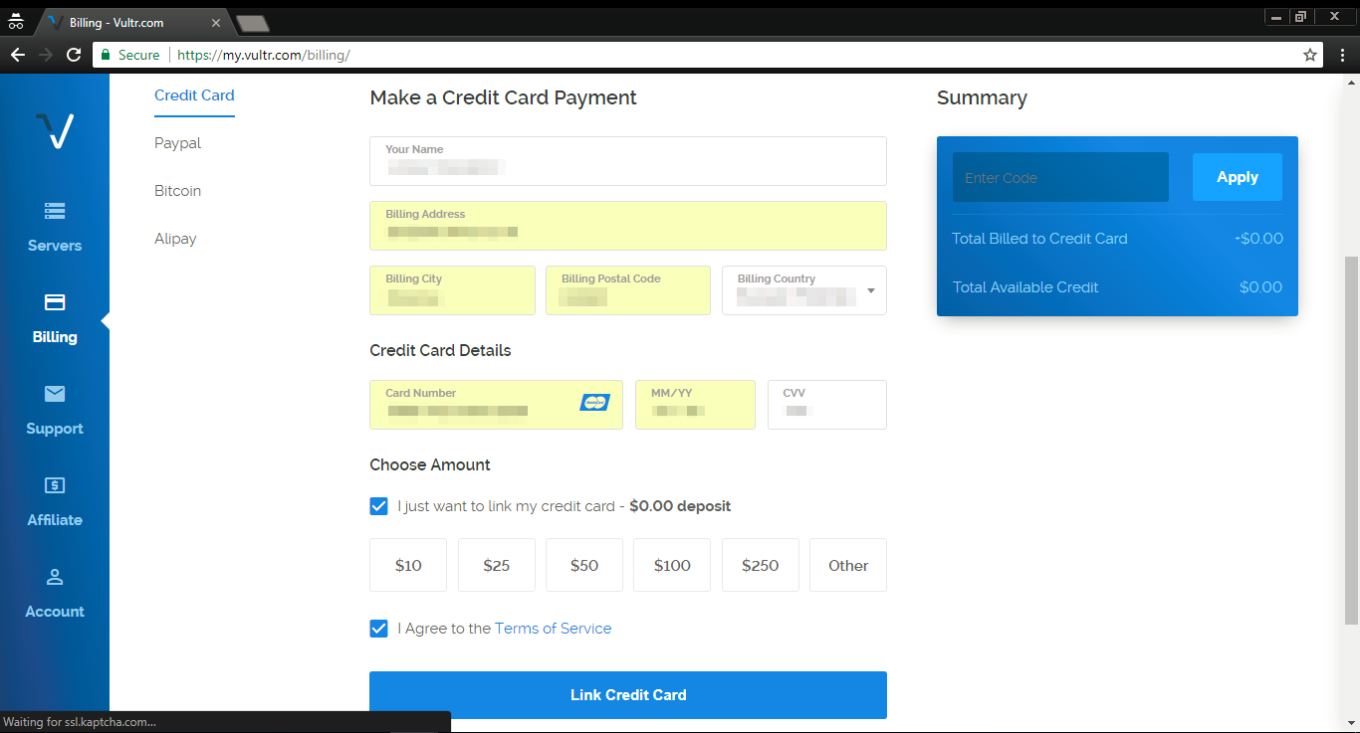
Important — if you are choosing credit card as your payment method, tick the "I just want to link my credit card" checkbox, otherwise, you will be charged immediately.

After you've linked your card, click on the "Servers" tab on the left, and then choose "Deploy New Server" (a button with a "plus" symbol).
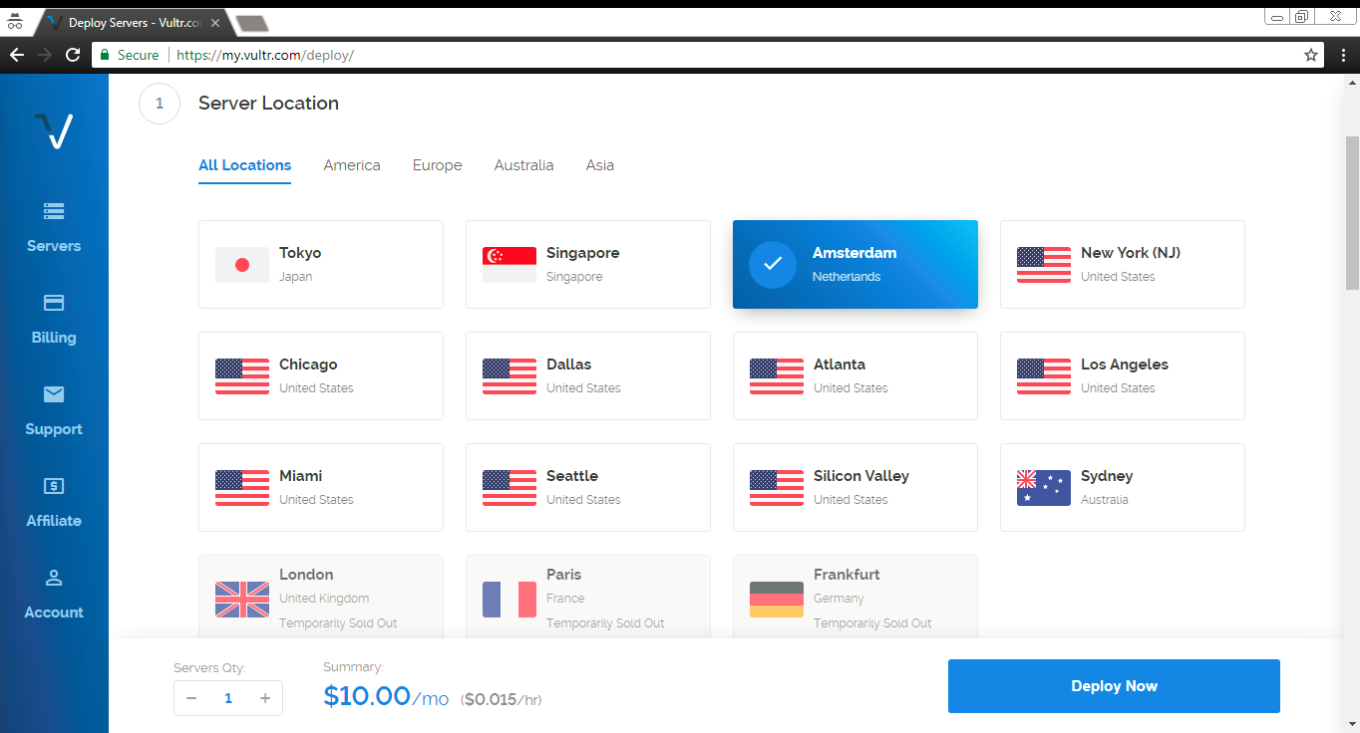
Ok, time to make a decision where our new server will be located. I've chosen one in Amsterdam, you can (and probably should, unless you have a specific reason) choose something relatively close to your geographical location.
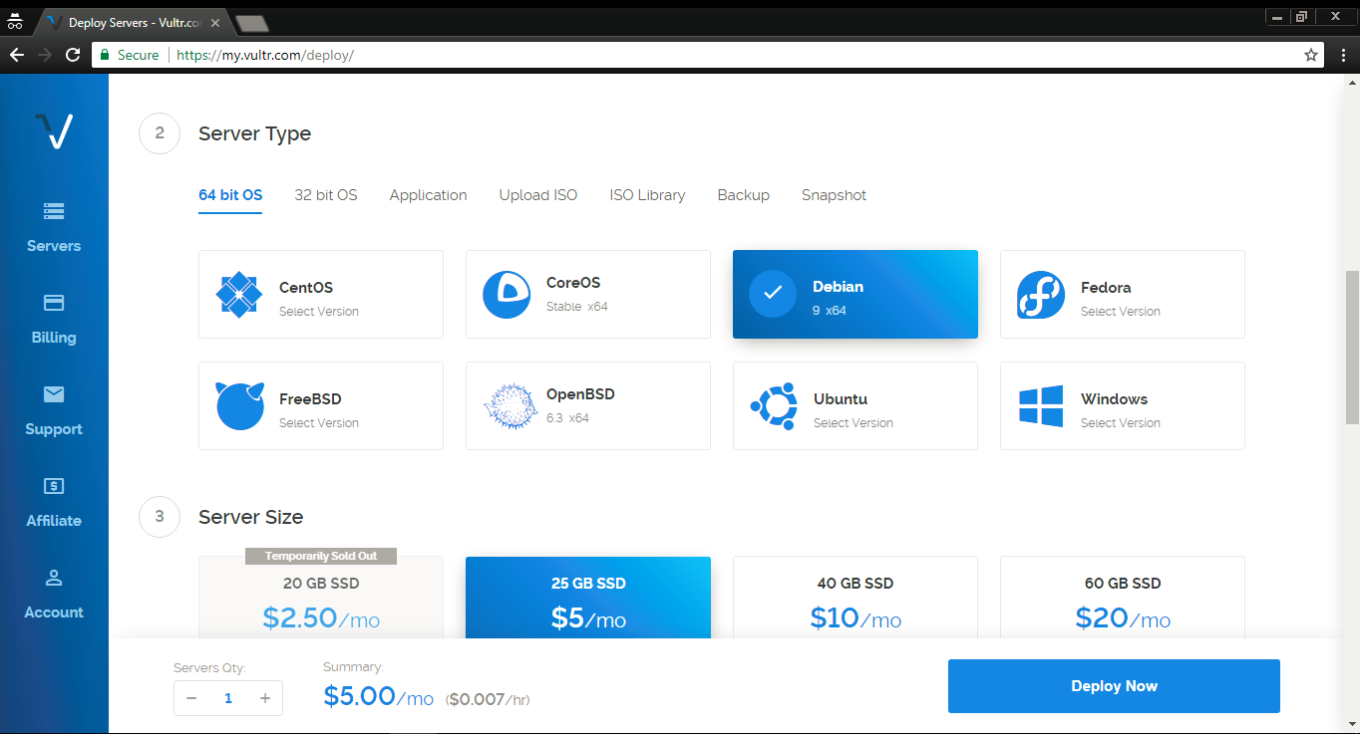
In the "Server type" tab select Debian 9 (x64) — this is very important!
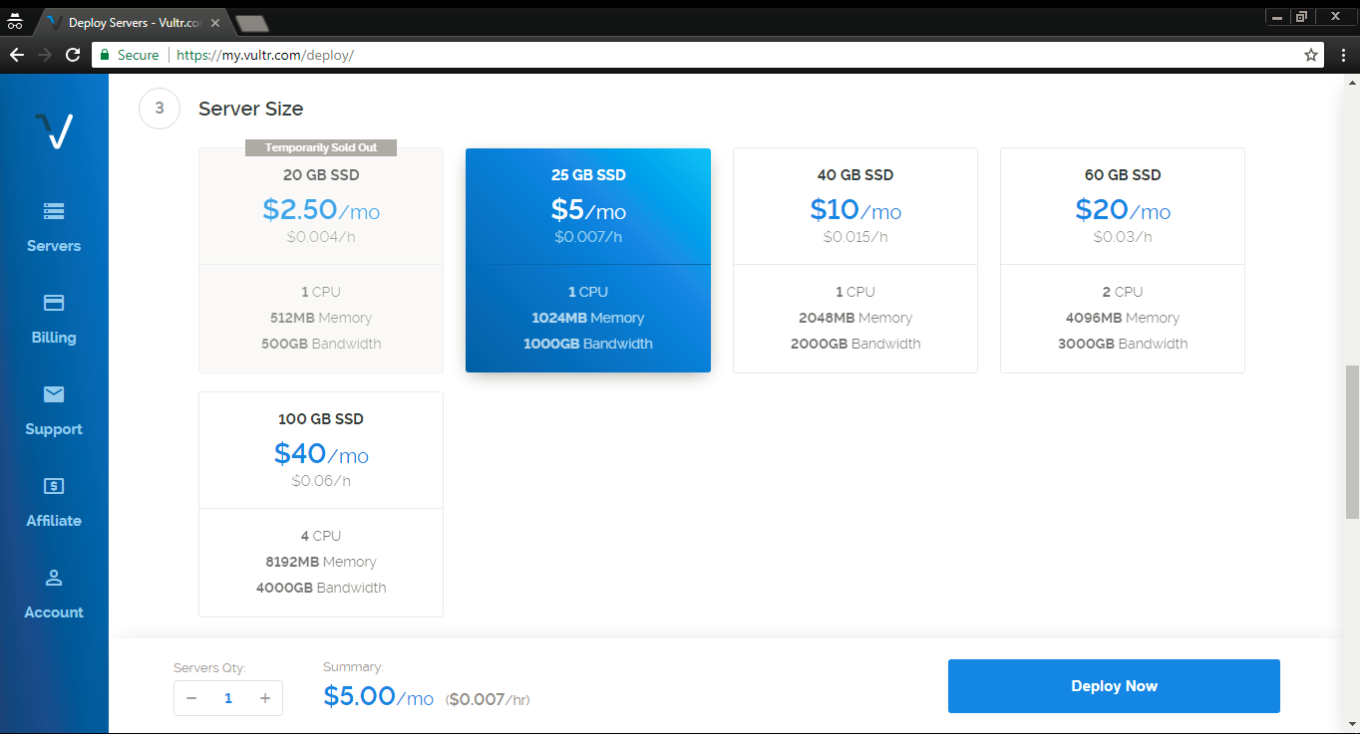
The third step is to select the server size, it depends solely on your needs and your budget. Most users will find 1 TB for $5/mo or 500 GB for $2.5/mo sufficient.
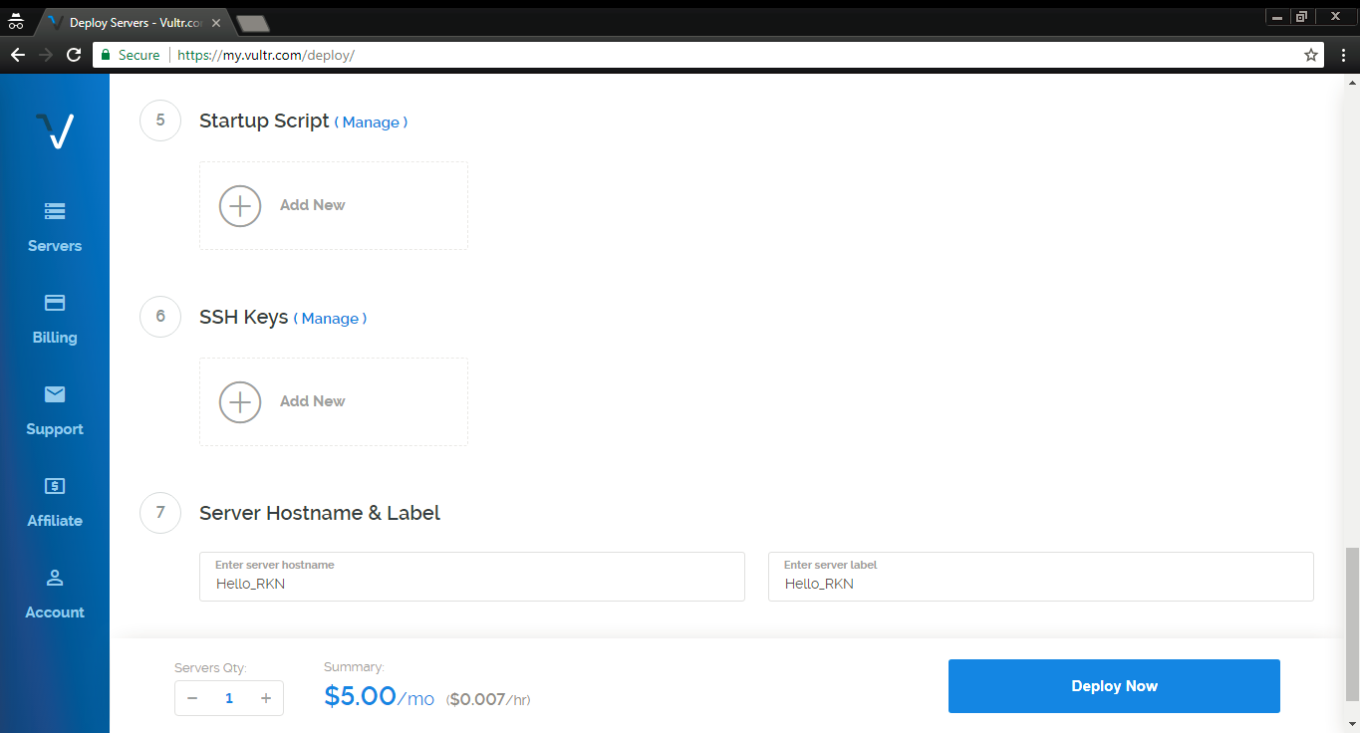
At steps 5 and 6 there's no need to change anything. At step 7 choose a hostname and a label for your server, any will do.

Aaaaand done! Smash the Deploy Now button to finish the process. You'll get another email to confirm that the server has been deployed — you'll need it later.

Installing PuTTY (for Windows users)

Now we have to install and set up a proxy on our freshly acquired server. Windows users can use the PuTTY tool, which can be downloaded here. Click on the .msi build under the "MSI (Windows Installer)" section. Mind if your OS is 32-bit or 64-bit when downloading the installer (if you are not sure, this article will help you determine it).
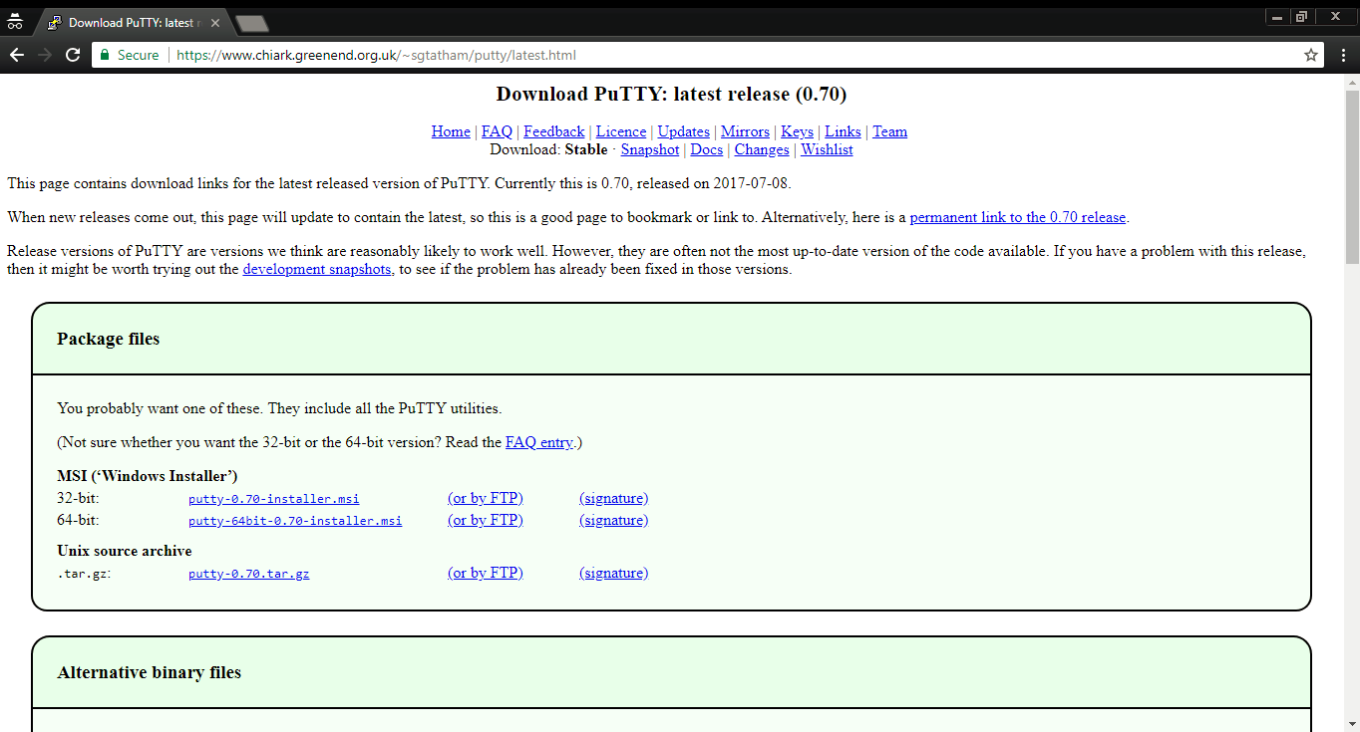
Open the .msi file and install PuTTY by following the wizard's instructions, and then run the tool.
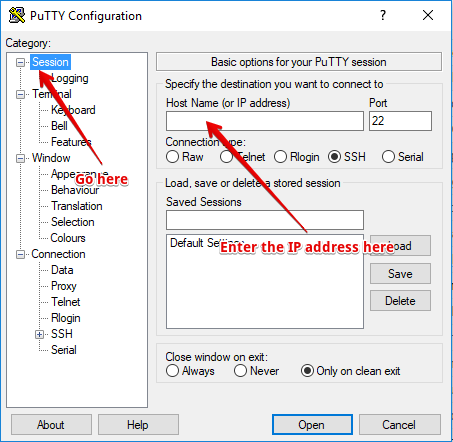
This is what you'll be faced with — don't get scared at the number of tabs and settings there, we'll basically only need one. Open the very first tab (Session) and enter the IP address you got in that confirmation email from Vultr.

Done? Then click the "Open" button located at the bottom. You'll see the console asking you to enter login and password (during the first launch there will be a warning pop-up — don't worry, it's fine, just press OK).
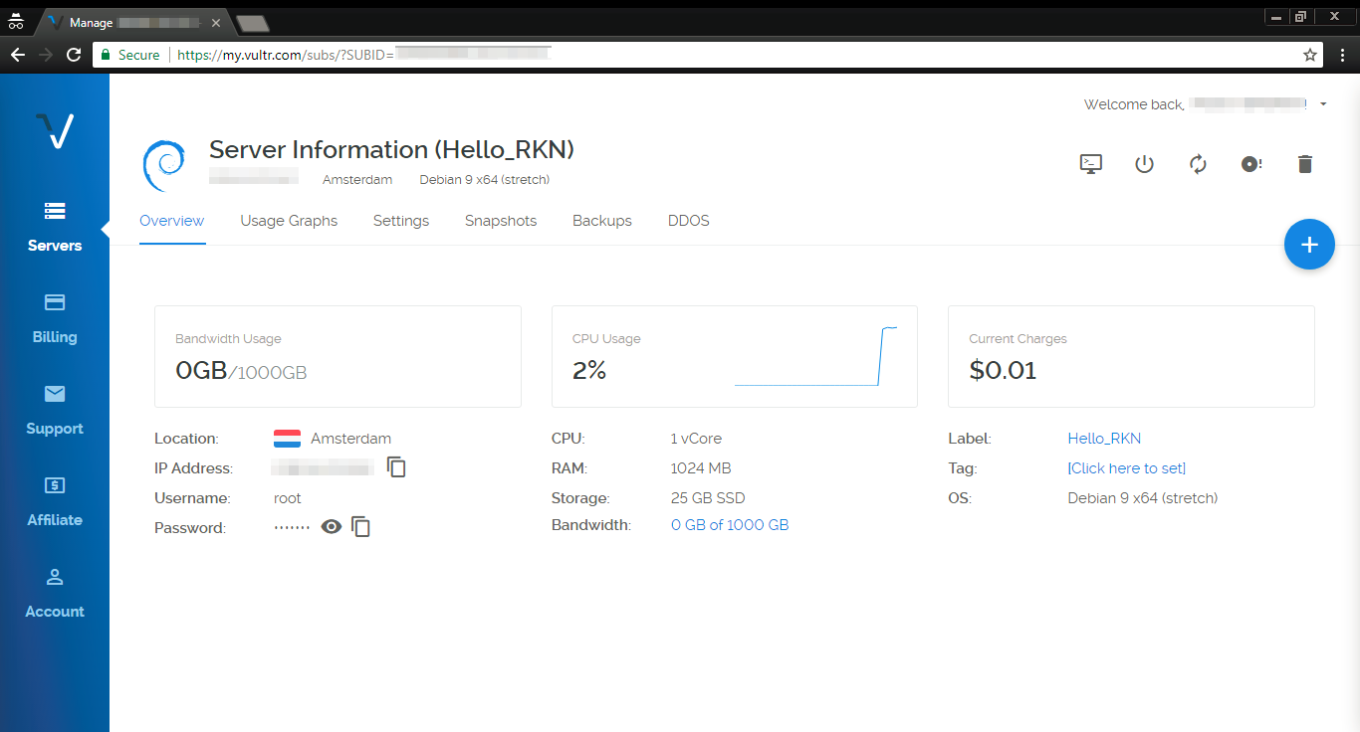
This data can be found in the Overview tab of your Vultr servers screen. The username will be root by default, and the password, of course, randomized (you can change it while you are at it). Ok, you've successfully entered login and password, which takes us to the next step — installing a proxy.

If you are a Mac user, you don't need to install putty or any other utility. All you have to do is open the Terminal and proceed to install and configure a proxy.

Setting up and configuring a proxy

For this purpose, we will use a special script by AdGuard that will perform all required actions. If everything has been going well so far, you should be seeing PuTTY console on your screen.
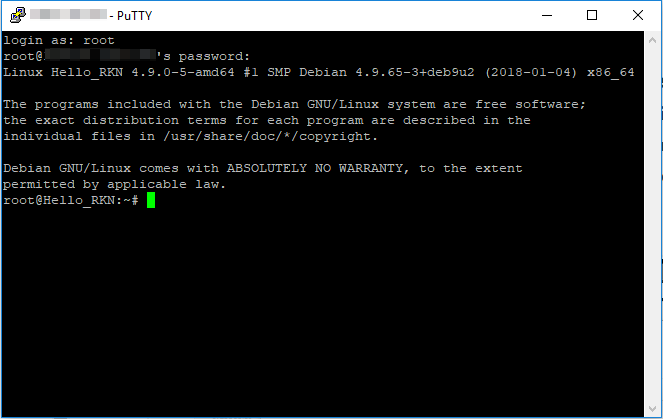
Subsequently execute the following commands in there (press Enter after each command):

apt-get update

The console should look somewhat like this:
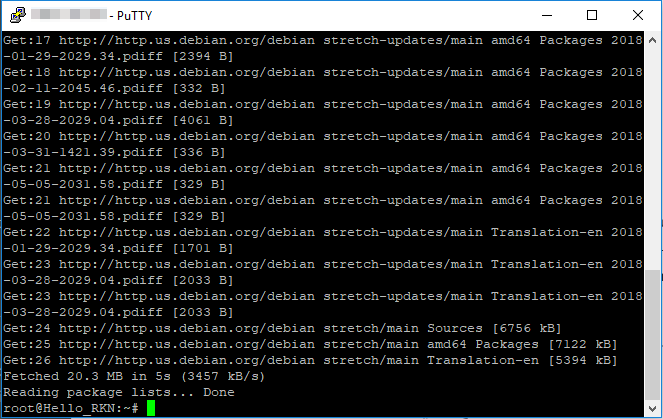
apt-get install curl -y

This is what you'll be seeing after executing this command:
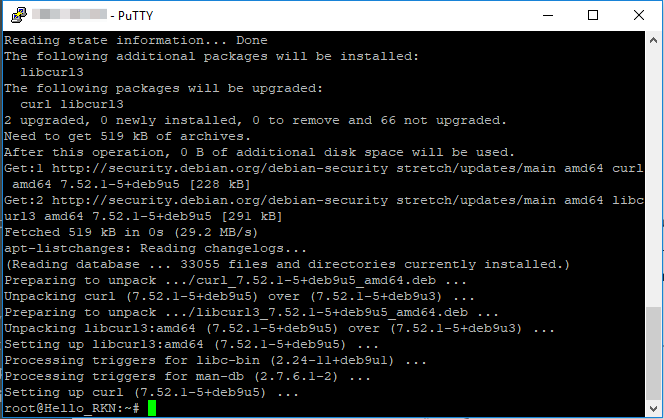
bash <(curl -s "https://raw.githubusercontent.com/AdguardTeam/ProxiesSetup/master/setup.sh")

At the 3rd step, the script will ask you for a username/password pair for your future proxy. You are free to choose any, but make sure to remember them, or even write them down. What it will look like:
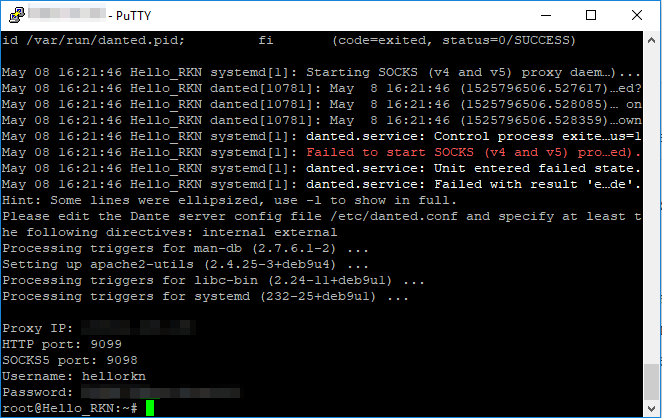
In the console, you will see the IP address of your proxy, HTTP port, SOCKS5 port, username and password. This information has to be entered whenever you want to configure your device/browser to use this proxy. Let's now have a look at a couple of specific examples.

Very important! SOCKS5 is not ideal in terms of security. Try not to use SOCKS5 proxy in public and unprotected networks. In one of the next articles, we'll tell about more secure solutions like Shadowsocks.

In case your server has restarted, you will need to reenable the danted service. To do so, run this command line in the console:

systemctl enable danted.service

Configuring proxy in AdGuard for Mac

Setting up a SOCKS5 proxy in AdGuard for Mac is pretty easy, especially since the proxy settings have been moved from the Advanced settings to the Network tab. Click the gear icon and select Preferences.
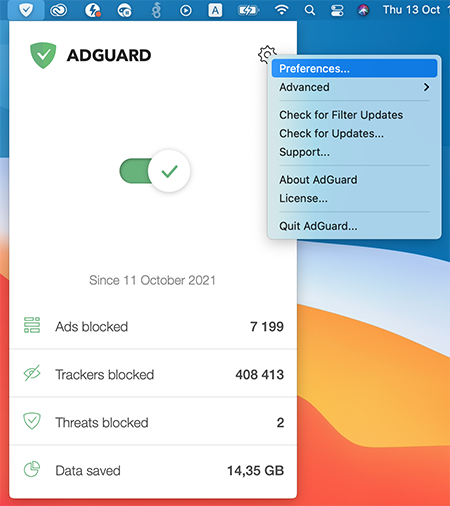
Settings_1

Now go to the Network tab, and then to the Outbound proxy tab. In the drop-down menu on the right, select SOCKS5. Fill in all the fields, using the data you have just seen in Terminal. To complete the setup, check the Outbound proxy box.
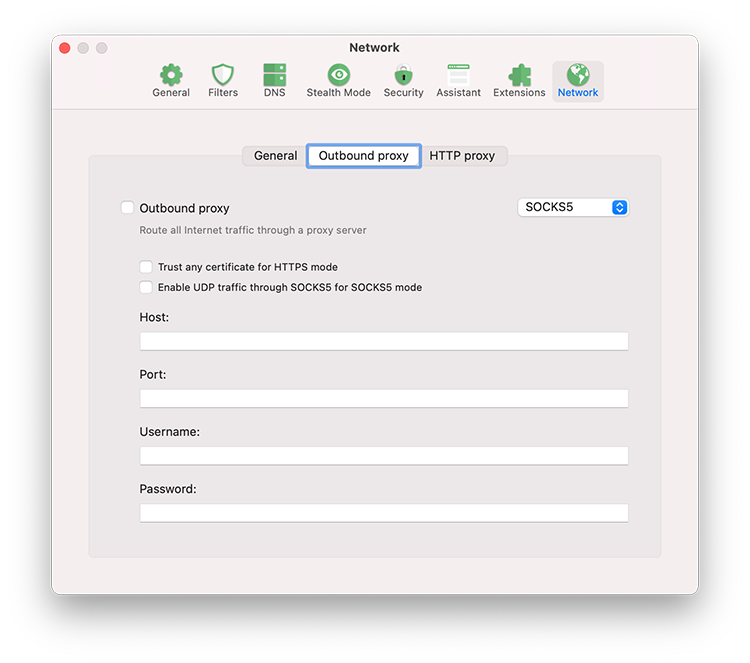
Settings_2

If you want to use AdGuard for Mac as an HTTP proxy to filter traffic on devices in your local network, go to the HTTP proxy tab and check the box Use AdGuard as an HTTP proxy.
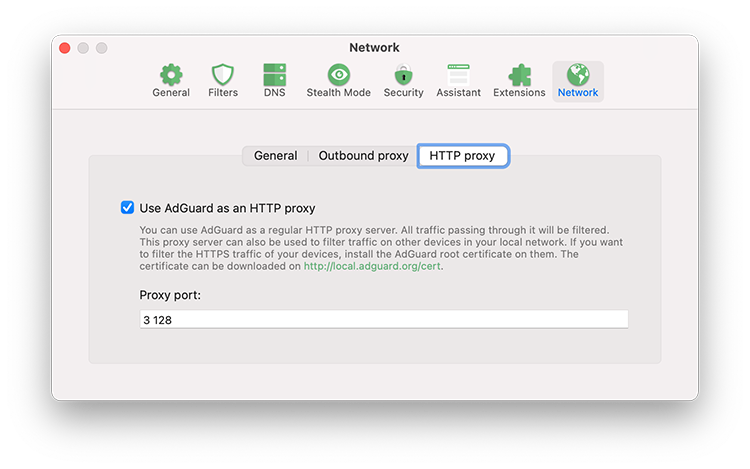
Settings_3

Configuring proxy in AdGuard for Android

There's no trickery here, we will be configuring our SOCKS5 proxy (since we need the authorization) just like we would configure any other proxy. Open the side menu of AdGuard app, go to "Settings - Proxy settings".
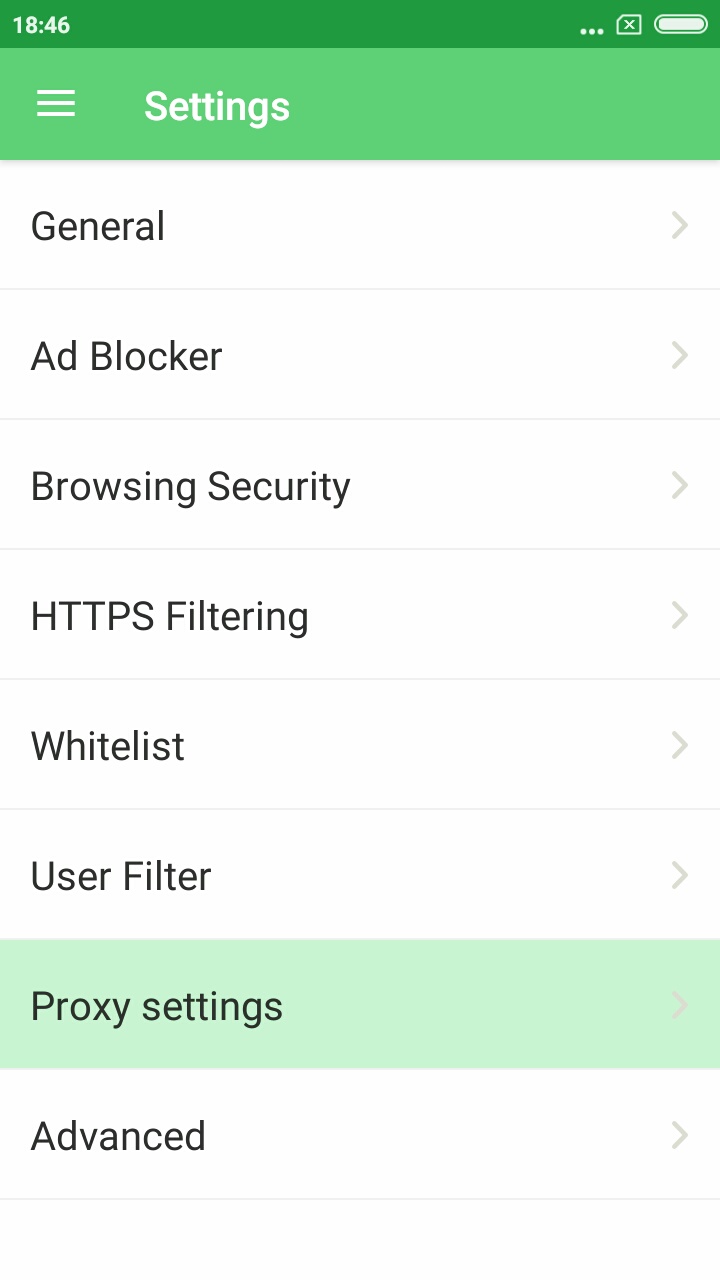
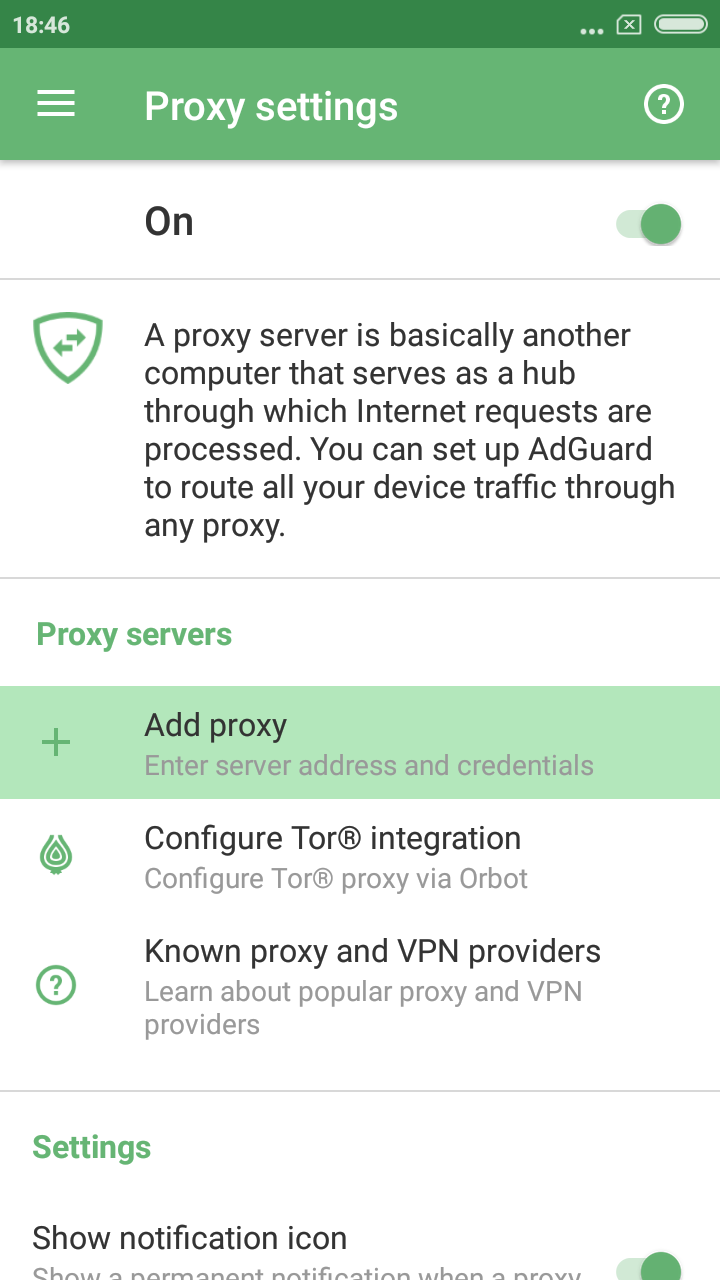
Don't forget to toggle the main switch in the top right corner on, then tap the "Add proxy" button.
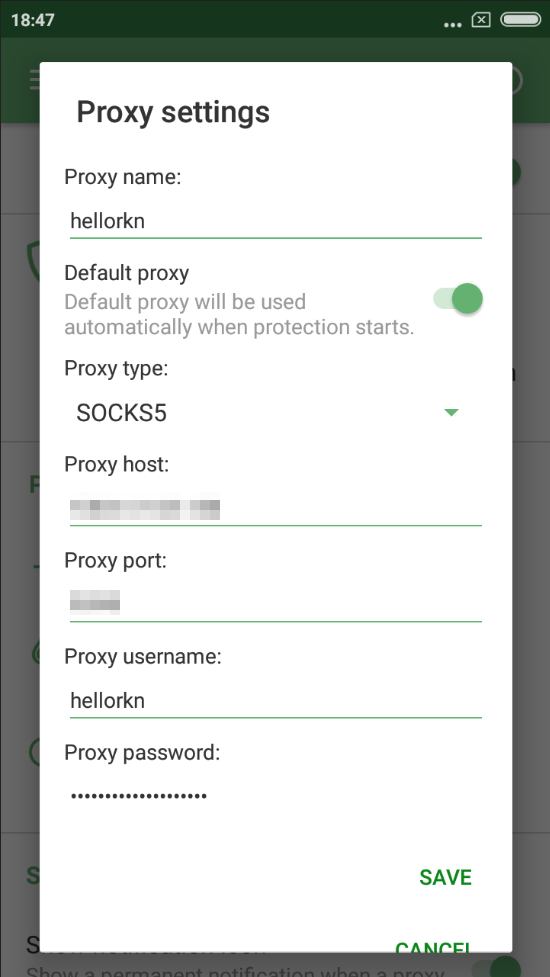
Fill out all the fields using data from PuTTY console. You can enter anything under "Proxy name". Also, enable the "Default proxy" option if you plan to mainly use this proxy.
Excellent! Tap Save, now all traffic filtered by AdGuard will be routed through your proxy. And by the way, you can still disable AdGuard filtering for any app(s) via "Apps management", it will prevent its traffic from being routed through the proxy.
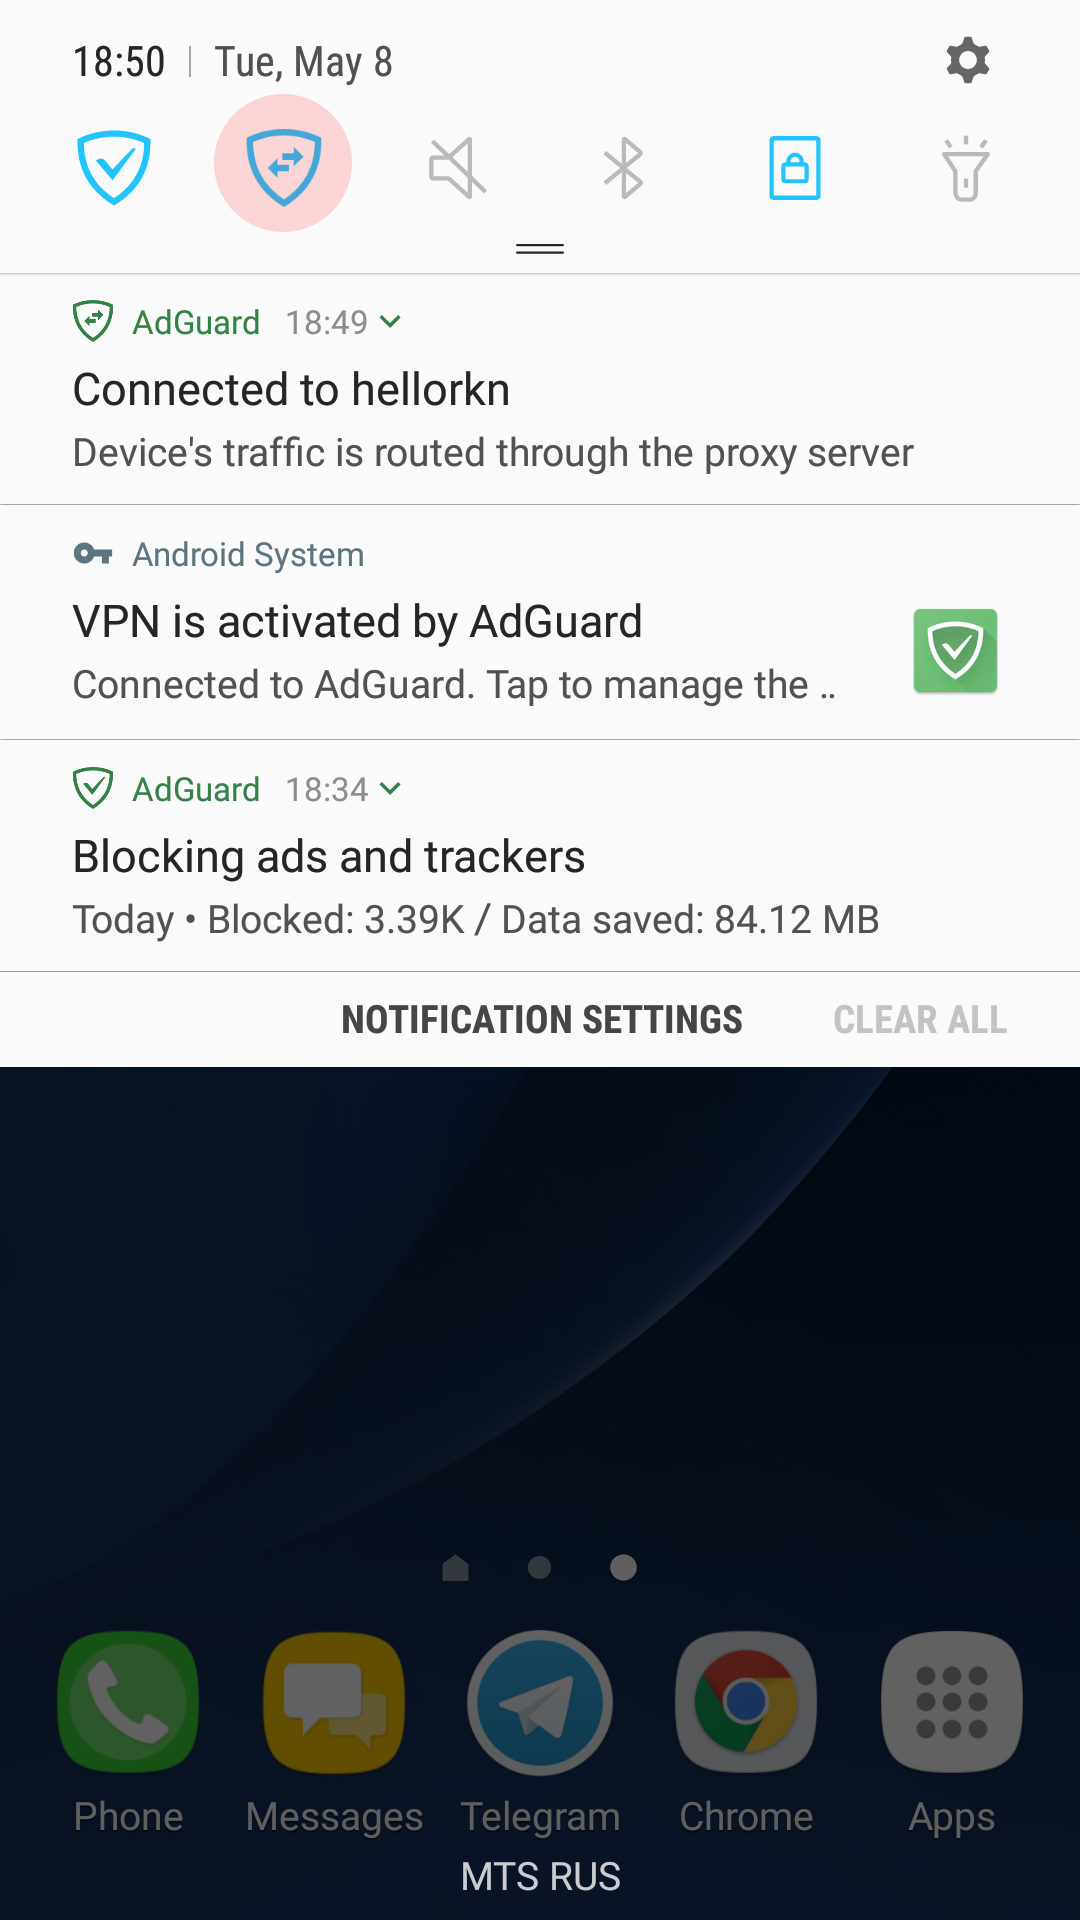
There's one trick that will allow you to instantly switch between enabling and disabling the proxy — you can add a specific tile to the quick access panel. Note there's a new notification in the notification bar, telling that your traffic is routed through the proxy server. Tapping on it will also take you to the "Proxy settings" screen in AdGuard.

Configuring proxy in Chrome/Firefox browsers

For this purpose, we advise using the SwitchyOmega browser extension. I use Chrome, so I'll be downloading it from the Chrome Store, Firefox users will find it among Firefox add-ons. Its unique trait is that it allows you to set up a proxy to be used on specific domains only, or, vice versa, to exclude specific domains.
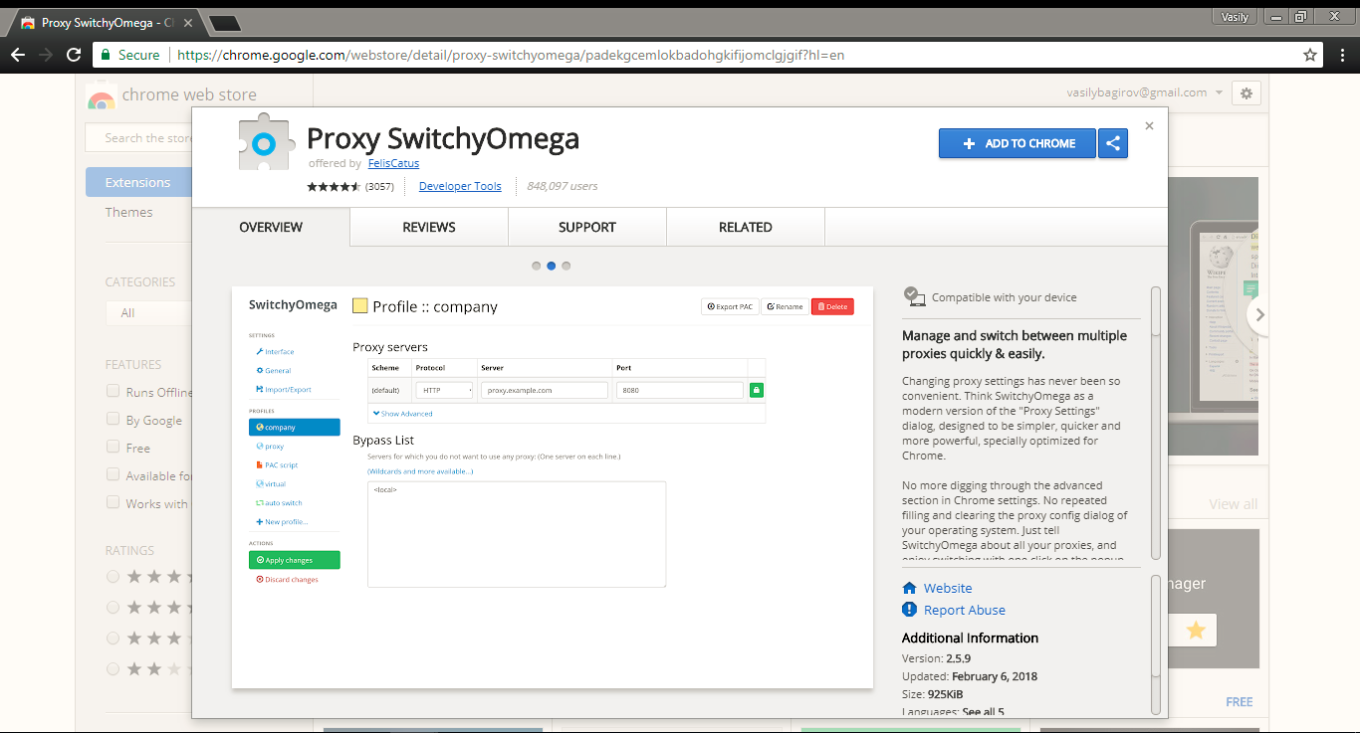
Configuring SwitchyOmega is very simple. Add a new profile ("+New profile") in the Profiles tab on the left. We need to choose HTTP protocol, since SOCKS5 does not support authorization here. Again, fill out the fields according to previously received information. Remember to apply changes by clicking the button on the left!

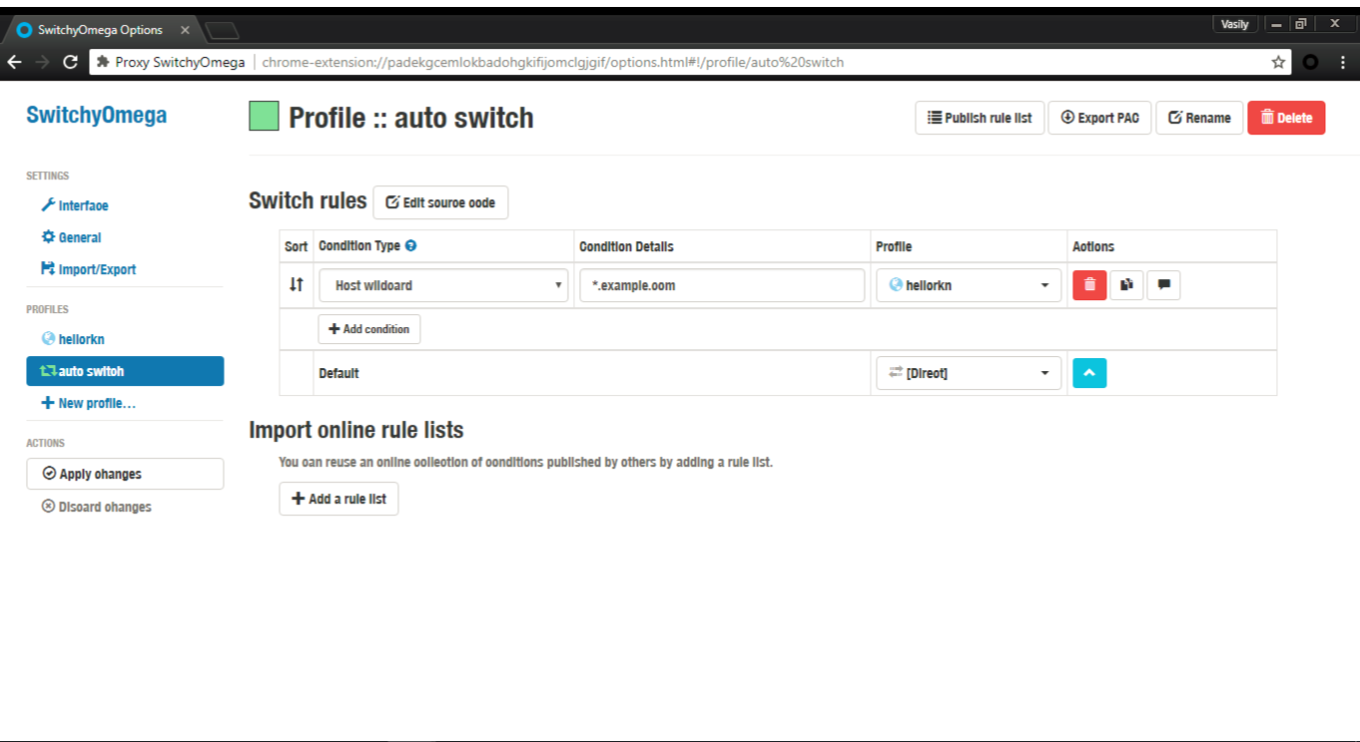
To make your browser use this proxy by default, in the "Auto switch" tab select the freshly added proxy in the Default drop-down menu.

In case you want your proxy to be used for specific websites or IP addresses only, set up respective switch rules. A tooltip will help you with the syntax.
And here's one small "lifehack" (please don't kill me for using this word): on any page you can quickly access proxy settings by clicking the SwitchyOmega extension icon. Manage proxy in respect to the current website, or change global proxy settings — everything is within a couple of clicks.
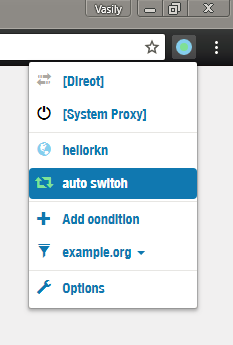
Color indicator also helps determining if the proxy is being used currently or not.

Summarizing

We've done it! If everything went according to plan, you should have your own server with a working proxy installed there, and respective settings on your phone/browser. Not so bad for 10 minutes spent on reading this article :)

Should you encounter any difficulties along the way, or if you just have any questions — let me know in the comments, and I (or some other team member) will help you get through! Good luck!


Спадабаўся пост?
AdGuard VPN AdGuard DNS AdGuard Mail AdGuard Wallet
Галоўны экран AdGuard для Windows
Экран абароны AdGuard для Windows, які паказвае функцыі абароны і налады
Экран Статыстыка AdGuard для Windows, які паказвае статыстыку заблакіраванай рэкламы і праграм сачэння
Экран Кіраванне праграмамі ў AdGuard для Windows, які паказвае параметры кіравання абаронай для праграм, усталяваных на прыладзе
20 362 20362 водгукі
Выдатна!
AdGuard: блакіроўшчык рэкламы для Windows

AdGuard для Windows — гэта больш, чым блакіроўшчык рэкламы. Гэта шматфункцыянальны інструмент, які блакуе рэкламу, кантралюе доступ да небяспечных сайтаў, паскарае загрузку старонак і абараняе дзяцей ад непажаданага кантэнту
Спампоўваючы праграму, вы прымаеце ўмовы Ліцэнзійнага пагаднення
Microsoft Store
Спампоўваючы праграму, вы прымаеце ўмовы Ліцэнзійнага пагаднення
AdGuard для Windows версія 8.0, 14 дзён пробнага перыяду
Галоўны экран AdGuard для Mac
Экран рэжыму нябачнасці AdGuard для Mac
20 362 20362 водгукі
Выдатна!

AdGuard: блакіроўшчык рэкламы для Mac

AdGuard для Mac — гэта ўнікальны блакіроўшчык рэкламы, распрацаваны з улікам macOS. Акрамя абароны ад надакучлівай рэкламы ў браўзерах і праграмах, ён абараняе вас ад адсочвання, фішынгу і махлярства
Спампоўваючы праграму, вы прымаеце ўмовы Ліцэнзійнага пагаднення
Чытаць далей
AdGuard для Mac версія 2.19, 14 дзён пробнага перыяду
Галоўны экран AdGuard для Android
Экран Абарона ад сачэння ў AdGuard для Android
Экран Кіраванне праграмамі ў AdGuard для Android, які паказвае параметры кіравання абаронай для праграм, усталяваных на прыладзе
Экран Статыстыка AdGuard для Android, які паказвае статыстыку заблакіраванай рэкламы і праграм сачэння
Галоўны экран прыватнага браўзера AdGuard для Android
QR-код, каб спампаваць AdGuard для Android
20 362 20362 водгукі
Выдатна!

AdGuard: блакіроўшчык рэкламы для Android

Блакуе рэкламу і трэкеры ва ўсіх браўзерах, гульнях і іншых праграмах. Абараняе вашу прыватнасць і дазваляе вам кантраляваць, як вашы праграмы выкарыстоўваюць Інтэрнэт. Усталёўваецца праз APK
Спампоўваючы праграму, вы прымаеце ўмовы Ліцэнзійнага пагаднення
Чытаць далей
Сканіраванне для загрузкі
Выкарыстоўвайце любы счытвальнік QR-кодаў, даступны на вашай прыладзе
AdGuard для Android версія 4.14, 14 дзён пробнага перыяду
Галоўны экран AdGuard для iOS
Экран абароны AdGuard для iOS, які паказвае функцыі абароны і налады
Экран Статыстыка AdGuard для iOS, які паказвае статыстыку заблакіраванай рэкламы і праграм сачэння
QR-код, каб спампаваць AdGuard для iOS
20 362 20362 водгукі
Выдатна!

AdGuard: блакіроўшчык рэкламы для iOS

Найлепшы блакіроўшчык рэкламы для iOS для iPhone і iPad. AdGuard ліквідуе ўсе віды рэкламы і трэкераў у Safari і абараняе вашу прыватнасць ва ўсіх праграмах на ўзроўні DNS
Спампоўваючы праграму, вы прымаеце ўмовы Ліцэнзійнага пагаднення
Чытаць далей
Сканіраванне для загрузкі
Выкарыстоўвайце любы счытвальнік QR-кодаў, даступны на вашай прыладзе
AdGuard для iOS, 4.5
Галоўны экран AdGuard Content Blocker
Экран фільтры ў AdGuard Content Blocker
Экран налады ў AdGuard Content Blocker
20 362 20362 водгукі
Выдатна!

Блакіроўшчык кантэнту AdGuard

AdGuard Content Blocker ухіляе ўсе віды рэкламы ў мабільных браўзерах, якія падтрымліваюць тэхналогію блакіроўкі змесціва — напрыклад, Samsung Internet і Яндэкс.Браўзер. Яго функцыі абмежаваныя ў параўнанні з AdGuard для Android, але ён бясплатны, просты ў усталёўцы і эфектыўны
Спампоўваючы праграму, вы прымаеце ўмовы Ліцэнзійнага пагаднення
Чытаць далей
Блакіроўшчык кантэнту AdGuard, 2.8
Галоўны экран браузернае пашырэнне AdGuard
Экран Абарона ад сачэння ў браузернае пашырэнне AdGuard
20 362 20362 водгукі
Выдатна!

Браўзернае пашырэнне AdGuard

AdGuard — самае хуткае і лёгкае браўзарнае пашырэнне для блакавання ўсіх тыпаў рэкламы! Абірайце AdGuard для хуткага і бяспечнага сёрфінга без рэкламы.
Усталяваць
Спампоўваючы праграму, вы прымаеце ўмовы Ліцэнзійнага пагаднення
Усталяваць
Спампоўваючы праграму, вы прымаеце ўмовы Ліцэнзійнага пагаднення
Усталяваць
Спампоўваючы праграму, вы прымаеце ўмовы Ліцэнзійнага пагаднення
Усталяваць
Спампоўваючы праграму, вы прымаеце ўмовы Ліцэнзійнага пагаднення
Усталяваць
Спампоўваючы праграму, вы прымаеце ўмовы Ліцэнзійнага пагаднення
Чытаць далей
Усталяваць
Спампоўваючы праграму, вы прымаеце ўмовы Ліцэнзійнага пагаднення
Чытаць далей
Браўзернае пашырэнне AdGuard, 5.5
Галоўны экран Браўзерны памочнік AdGuard
20 362 20362 водгукі
Выдатна!

Памочнік AdGuard

Пашырэнне для браўзера-компаньён для настольных прыкладанняў AdGuard. Яно дазваляе блакіраваць карыстальніцкія элементы на вэб-сайтах, дадаваць вэб-сайты ў спіс дазволеных і адпраўляць справаздачы непасрэдна з вашага браўзера
Памочнік AdGuard, 1.4
20 362 20362 водгукі
Выдатна!

AdGuard Home

AdGuard Home — гэта сеткавае рашэнне для блакіроўкі рэкламы і праграм сачэння. Усталюйце яго адзін раз на вашым маршрутызатары, каб ахапіць усе прылады ў сетцы — дадатковае праграмнае забеспячэнне не патрабуецца. Гэта асабліва важна для розных прылад IoT, якія часта ўяўляюць пагрозу вашай прыватнасці
AdGuard Home, 0.107
Галоўны экран AdGuard Pro для iOS
Экран абароны ў AdGuard Pro для iOS, які паказвае функцыі абароны і налады
Экран Статыстыка ў AdGuard Pro для iOS, які паказвае статыстыку заблакіраванай рэкламы і праграм сачэння
20 362 20362 водгукі
Выдатна!

AdGuard Pro для iOS

AdGuard Pro для iOS пастаўляецца з усімі дадатковымі функцыямі блакіроўкі рэкламы і абароны, якія ўключаны. Ён прапануе тыя ж інструменты, што і платная версія AdGuard для iOS. Выдатна блакіруе рэкламу ў Safari, а таксама дазваляе наладжваць налады DNS, каб адаптаваць вашу абарону. Ён блакіруе рэкламу ў браўзерах і дадатках, абараняе дзяцей ад недапушчальнага кантэнту і захоўвае вашы асабістыя даныя бяспечнымі
Спампоўваючы праграму, вы прымаеце ўмовы Ліцэнзійнага пагаднення
Чытаць далей
AdGuard Pro для iOS, 4.5
Галоўны экран AdGuard Mini для Mac
Экран абароны Safari ў AdGuard Mini для Mac
Экран стварэння правіла ў AdGuard Mini для Mac
20 362 20362 водгукі
Выдатна!

AdGuard Mini для Mac — блакіроўшчык рэкламы ў Safari

AdGuard Mini для Mac — гэта магутны блакіроўшчык рэкламы для Safari. Гэта лёгкая праграма выдаляе рэкламу, блакуе праграмы сачэння і паскарае загрузку старонак. Яна дапамагае вам аглядаць вэб у Safari без адцягненняў і захоўваць вашы даныя ў прыватнасці
Усталяваць
Спампоўваючы праграму, вы прымаеце ўмовы Ліцэнзійнага пагаднення
Чытаць далей
AdGuard Mini для Mac, 2.3
Галоўны экран AdGuard для Android TV з уключанай абаронай
Экран блакіроўкі рэкламы AdGuard для Android TV, які паказвае яго функцыі і налады
Экран налады AdGuard для Android TV
Экран Кіраванне праграмамі AdGuard для Android TV, які паказвае праграмы, дзе рэклама і праграмы сачэння заблакіравана
20 362 20362 водгукі
Выдатна!

AdGuard для Android TV

AdGuard для Android TV — адзіная праграма, якая блакіруе рэкламу, ахоўвае вашу прыватнасць і працуе як міжсеткавы экран для вашага Smart TV. Атрымуйце папярэджанні аб вэб-пагрозах, выкарыстоўвайце бяспечны DNS і атрымлівайце перавагі ад шыфраванага трафіку. Адпачывайце і атрымлівайце асалоду ад улюбёных шоу з першакласнай абаронай і без рэкламы!
AdGuard для Android TV версія 4.14, 14 дзён пробнага перыяду
Маскот AdGuard, Агнар, трымае пінгвіна Linux
20 362 20362 водгукі
Выдатна!

AdGuard для Linux

AdGuard для Linux — гэта першы ў свеце сістэмны блакіроўшчык рэкламы для Linux. Блакуйце рэкламу і трэкеры на ўзроўні прылады, выбірайце з папярэдне ўсталяваных фільтраў альбо дадавайце ўласныя — усё праз інтэрфейс каманднага радка
AdGuard для Linux, 1.4
20 362 20362 водгукі
Выдатна!

AdGuard Temp Mail

Ваш часовы паштовую скрыню, каб на асноўную пошту не прыходзіў спам
20 362 20362 водгукі
Выдатна!

AdGuard VPN

75 лакацый па ўсім свеце

Доступ да любога кантэнту

Моцнае шыфраванне

Без лагавання

Самае хуткае злучэнне

Цэладзённая падтрымка

Паспрабуйце бясплатна
Спампоўваючы праграму, вы прымаеце ўмовы Ліцэнзійнага пагаднення
Чытаць далей
20 362 20362 водгукі
Выдатна!

AdGuard DNS

AdGuard DNS – гэта альтэрнатыўны спосаб заблакаваць рэкламу, абараніць асабістыя дадзеныя і ахаваць дзяцей ад дарослых матэрыялаў. Ён просты ў наладзе і выкарыстанні і забяспечвае патрэбны мінімум абароны ад рэкламы, трэкінгу і фішынгу, незалежна ад платформы.
20 362 20362 водгукі
Выдатна!

AdGuard Mail

Абараняйце сваю асобу, пазбягайце спаму і трымайце ўваходную пошту ў бяспецы з дапамогай нашых псеўданімаў і часовых адрасоў электроннай пошты. Скарыстайцеся нашым бясплатным сэрвісам перасылкі электроннай пошты і праграмамі для ўсіх аперацыйных сістэм.
20 362 20362 водгукі
Выдатна!

AdGuard Wallet

Бяспечны і прыватны крыпта-кашалёк, які дае вам поўны кантроль над вашымі актывамі. Адкрывайце для сябе тысячы крыптавалют для захоўвання, адпраўкі і абмену
Спампоўка AdGuard Каб усталяваць AdGuard, пстрыкніце файл, пазначаны стрэлкай Выберыце «Адкрыць» і націсніце «ОК», затым дачакайцеся спампоўкі файла. У акне, якое адкрылася, перацягніце значок AdGuard у папку «Праграмы». Дзякуй, што выбралі AdGuard! Выберыце «Адкрыць» і націсніце «ОК», затым дачакайцеся спампоўкі файла. У акне, якое адкрылася, націсніце «Усталяваць». Дзякуй, што выбралі AdGuard!
Усталюйце AdGuard на мабільную прыладу