How to set up your own proxy and use it with AdGuard

In our day and age, it is becoming increasingly important to have access to any online resources that you need, at any time. This is not always convenient or even possible at all — take such example as using a network with overly restrictive firewall. What will help you be 100% sure you can access any website is setting up your own proxy. Not to mention proxy will hide your IP and let you access geo-blocked websites.

In this article, we will walk together all the way from renting our own server to configuring proxy on a mobile device or in a browser.

Renting your own server

For starters, we'll need to rent a server. You can choose any web hosting service you prefer, I will be using Vultr as an example.

I emphasize that I don't try to advertise or distinguish this service, it was only chosen as an example. Among other possible solutions are HostGator, 1&1, Cloudways, Bytemark, Digital Ocean and many, many more.

Alright, let's get to it. I start by opening vultr.com and signing up there ("Create Account" button in the top right corner).
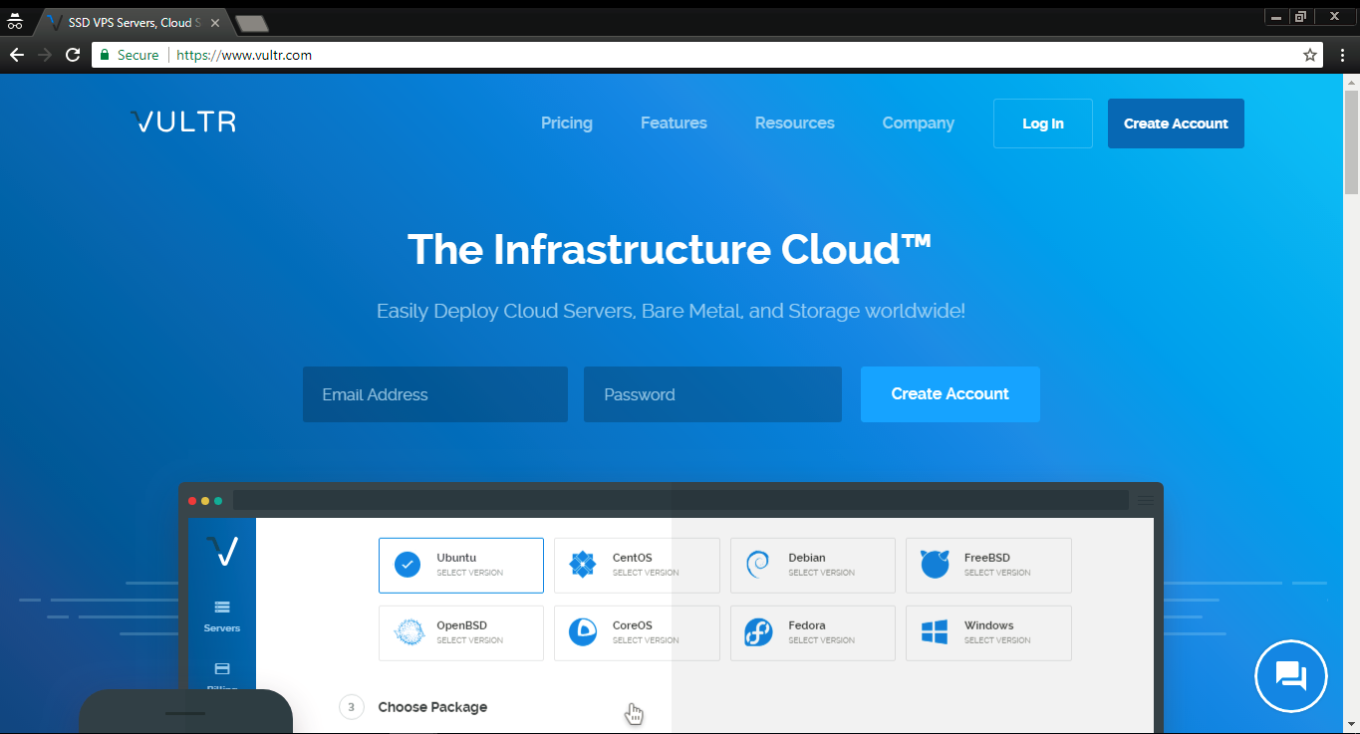
If you did the same, you'll receive an email with a link to confirm your registration. Once you do it and log in, you'll be asked to choose a payment method. I selected Credit card, but you are free to use any other, obviously.
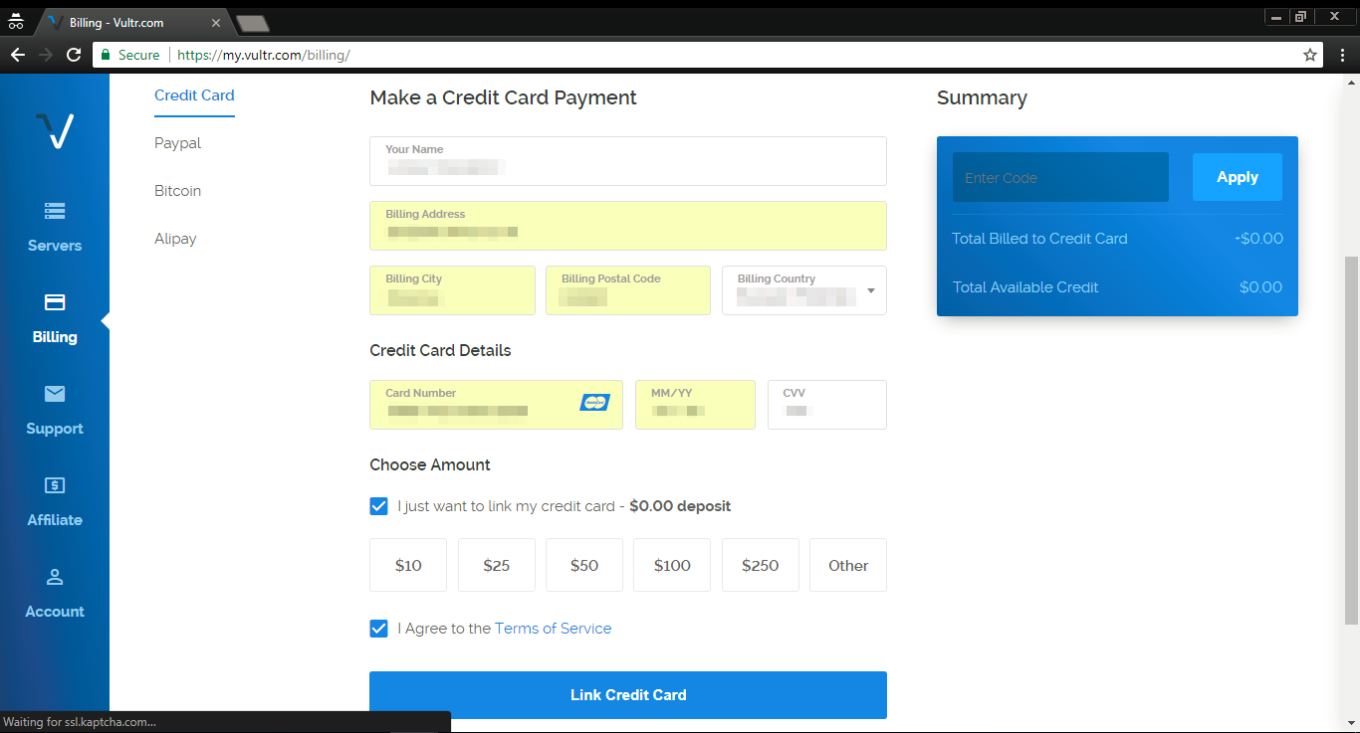
Important — if you are choosing credit card as your payment method, tick the "I just want to link my credit card" checkbox, otherwise, you will be charged immediately.

After you've linked your card, click on the "Servers" tab on the left, and then choose "Deploy New Server" (a button with a "plus" symbol).
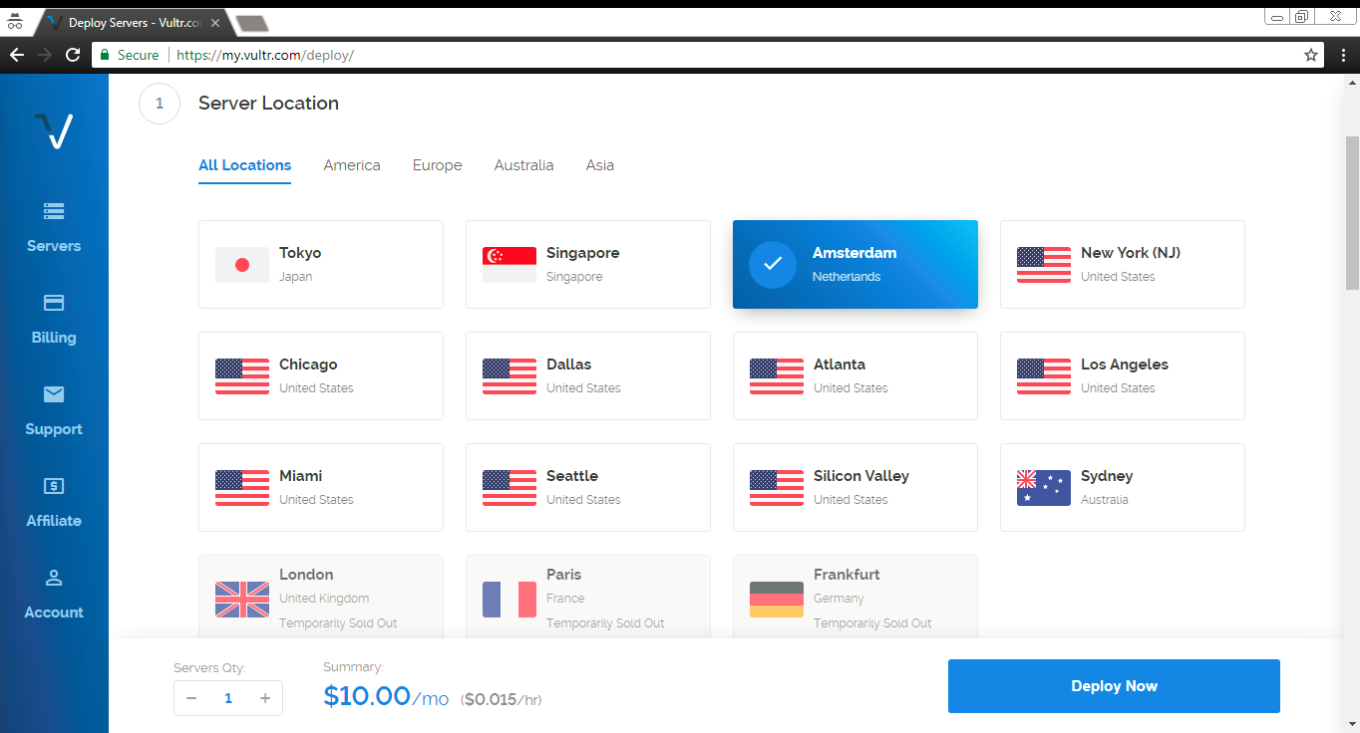
Ok, time to make a decision where our new server will be located. I've chosen one in Amsterdam, you can (and probably should, unless you have a specific reason) choose something relatively close to your geographical location.
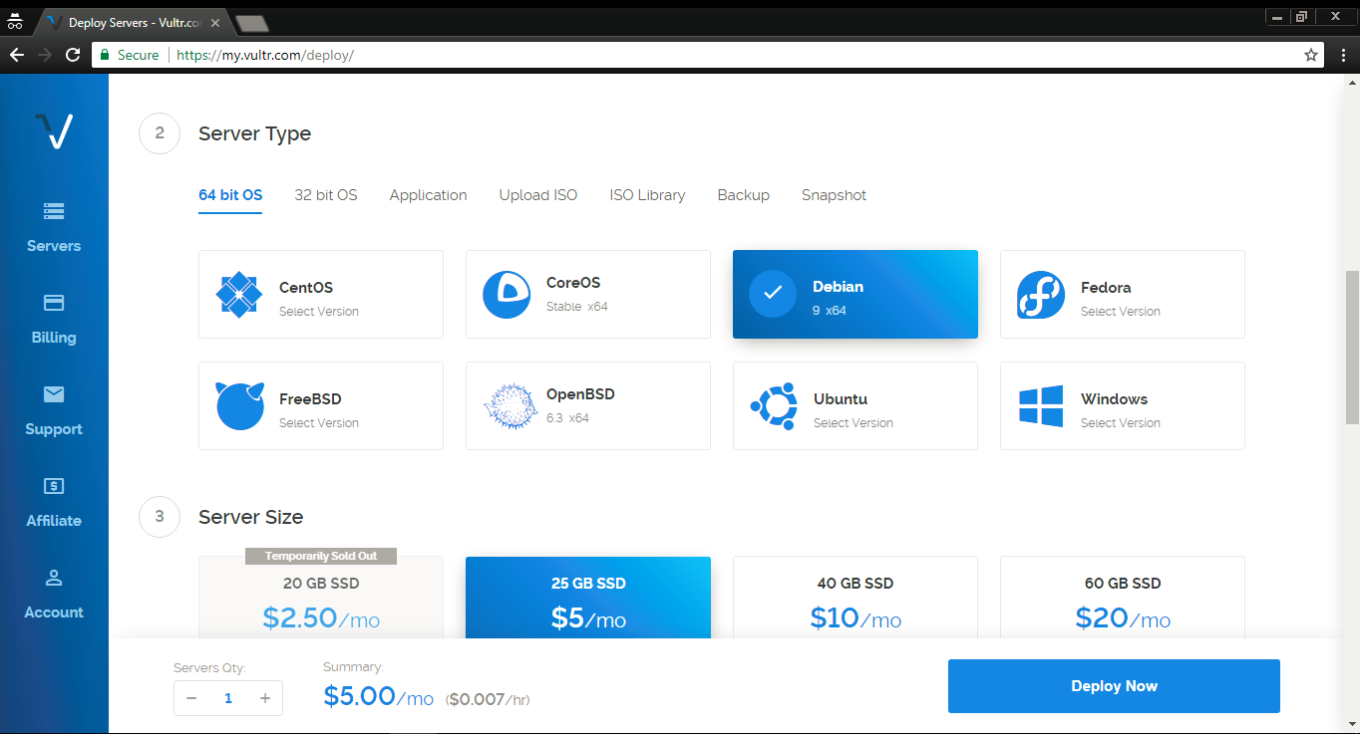
In the "Server type" tab select Debian 9 (x64) — this is very important!
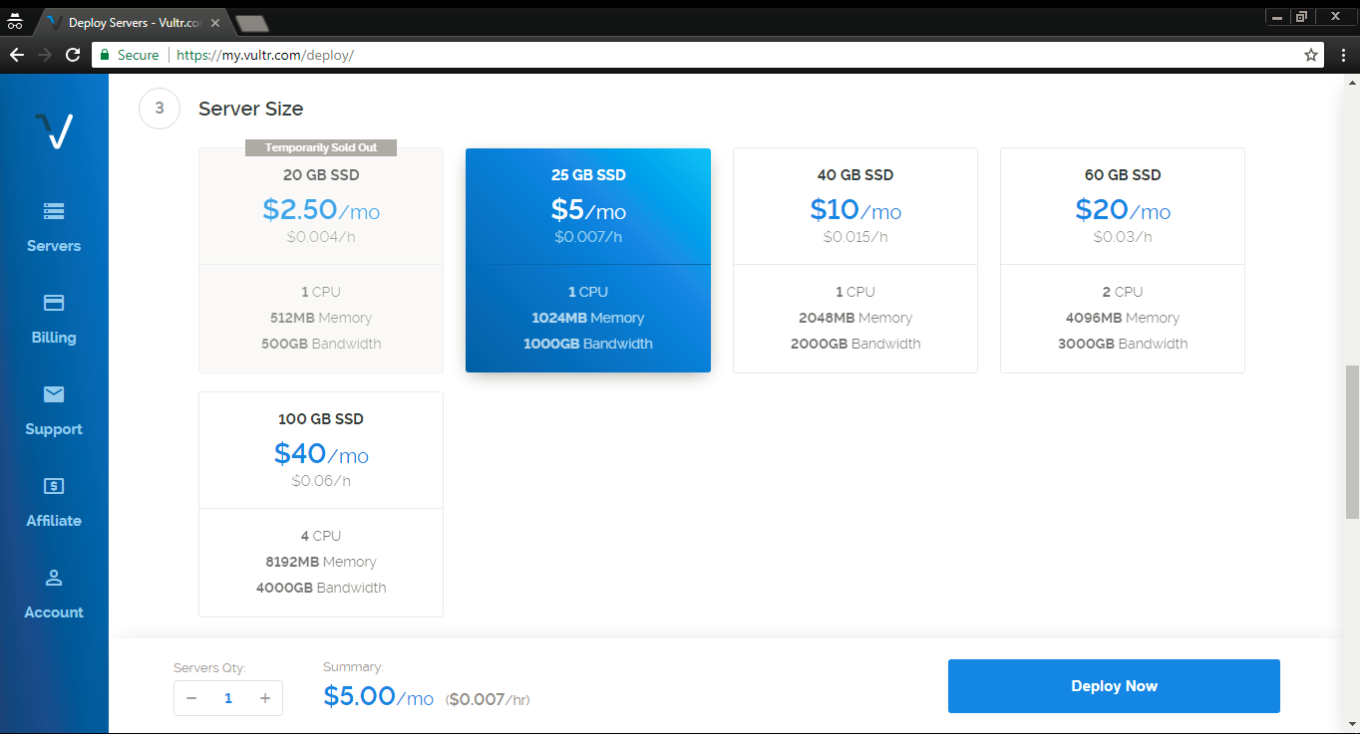
The third step is to select the server size, it depends solely on your needs and your budget. Most users will find 1 TB for $5/mo or 500 GB for $2.5/mo sufficient.
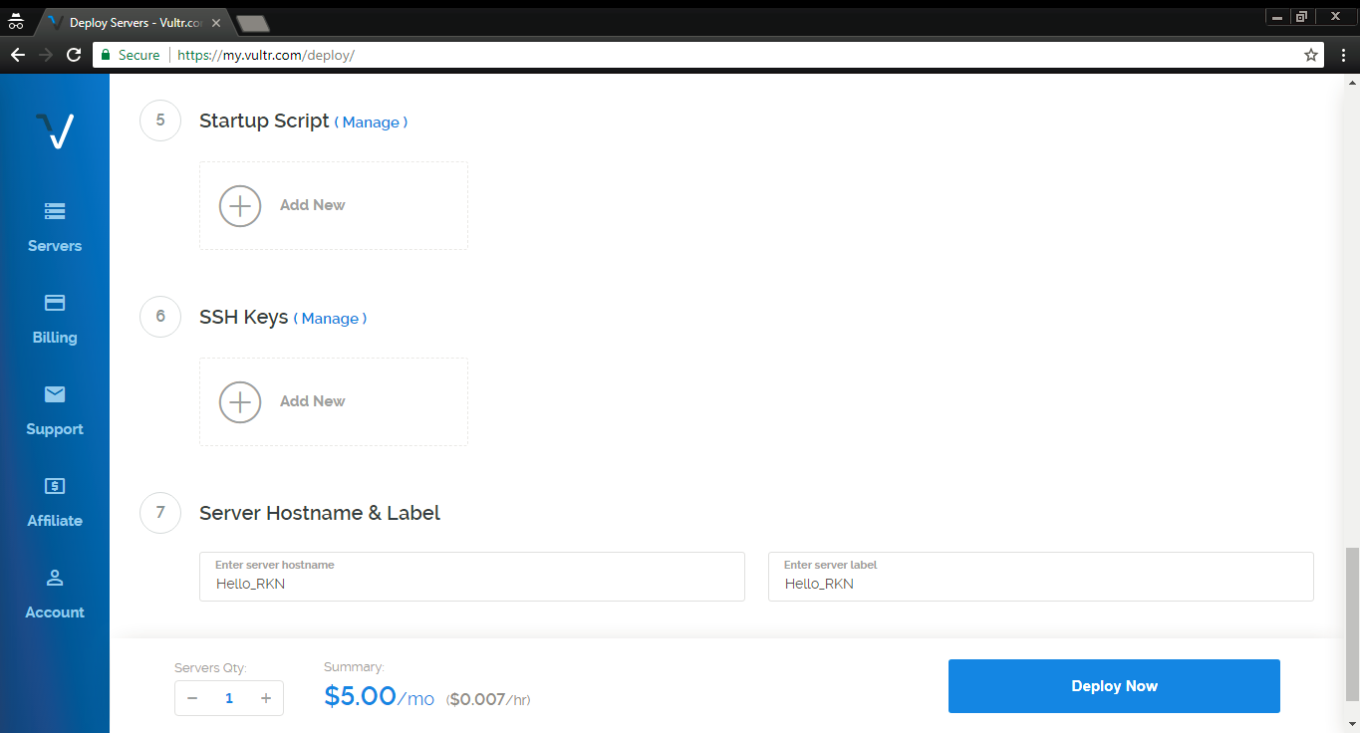
At steps 5 and 6 there's no need to change anything. At step 7 choose a hostname and a label for your server, any will do.

Aaaaand done! Smash the Deploy Now button to finish the process. You'll get another email to confirm that the server has been deployed — you'll need it later.

Installing PuTTY (for Windows users)

Now we have to install and set up a proxy on our freshly acquired server. Windows users can use the PuTTY tool, which can be downloaded here. Click on the .msi build under the "MSI (Windows Installer)" section. Mind if your OS is 32-bit or 64-bit when downloading the installer (if you are not sure, this article will help you determine it).
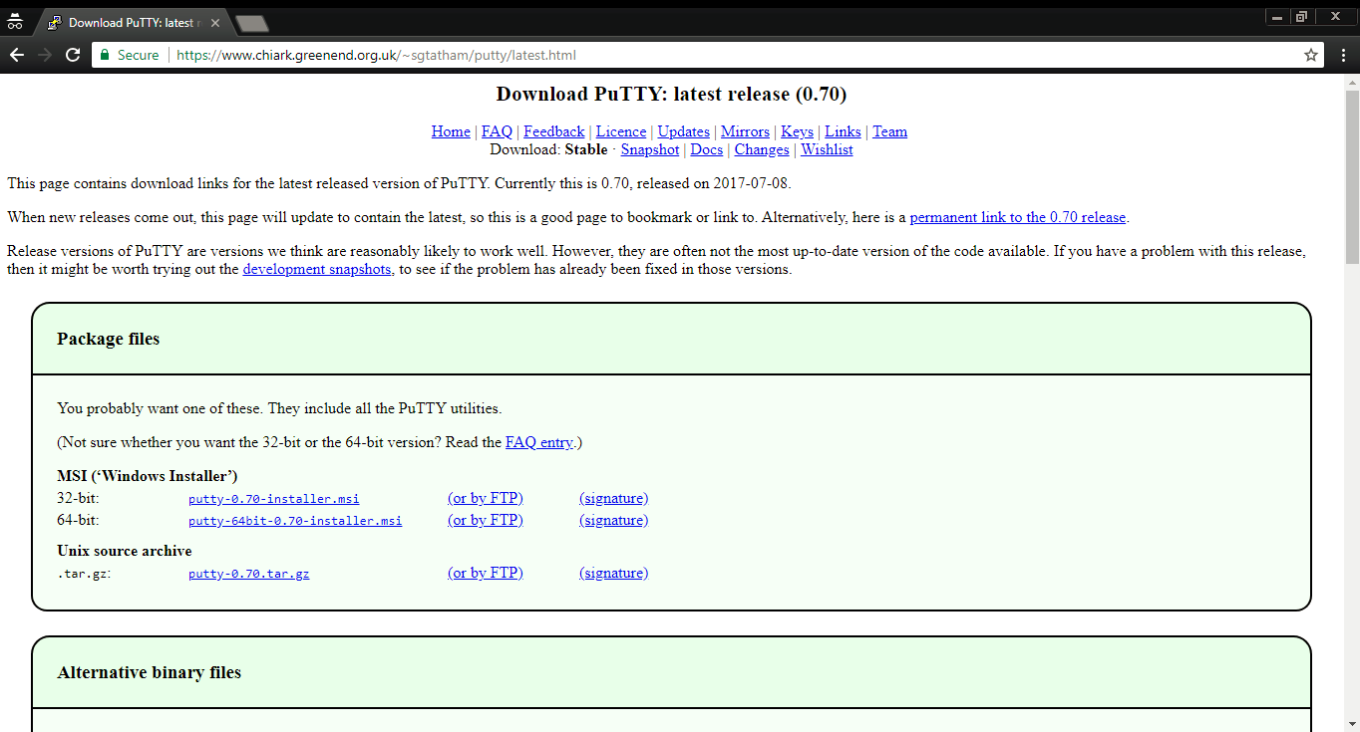
Open the .msi file and install PuTTY by following the wizard's instructions, and then run the tool.
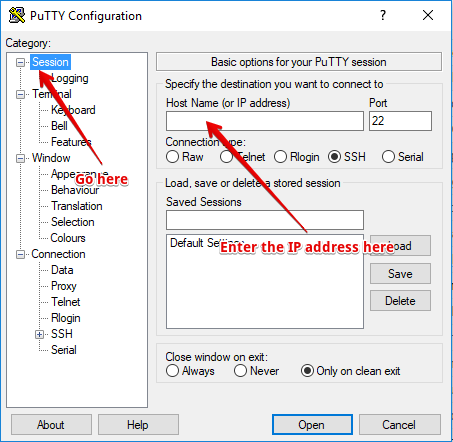
This is what you'll be faced with — don't get scared at the number of tabs and settings there, we'll basically only need one. Open the very first tab (Session) and enter the IP address you got in that confirmation email from Vultr.

Done? Then click the "Open" button located at the bottom. You'll see the console asking you to enter login and password (during the first launch there will be a warning pop-up — don't worry, it's fine, just press OK).
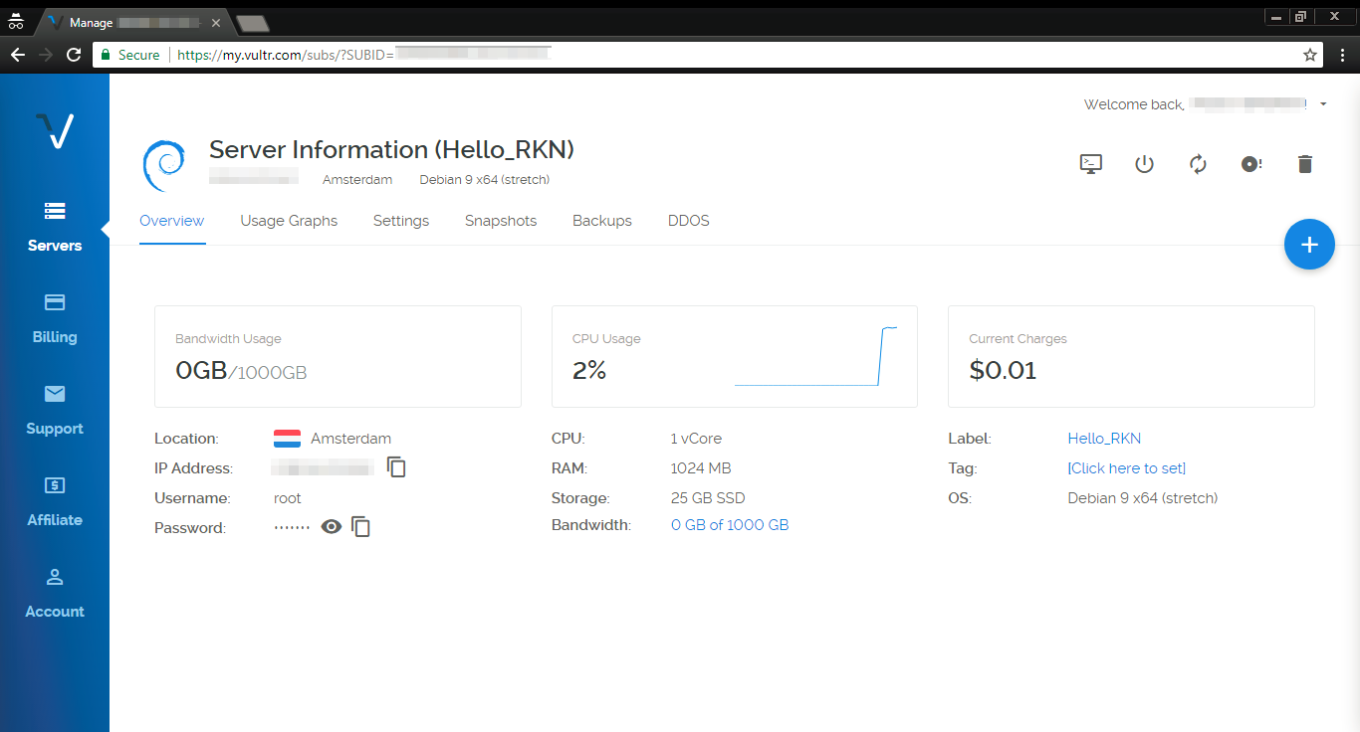
This data can be found in the Overview tab of your Vultr servers screen. The username will be root by default, and the password, of course, randomized (you can change it while you are at it). Ok, you've successfully entered login and password, which takes us to the next step — installing a proxy.

If you are a Mac user, you don't need to install putty or any other utility. All you have to do is open the Terminal and proceed to install and configure a proxy.

Setting up and configuring a proxy

For this purpose, we will use a special script by AdGuard that will perform all required actions. If everything has been going well so far, you should be seeing PuTTY console on your screen.
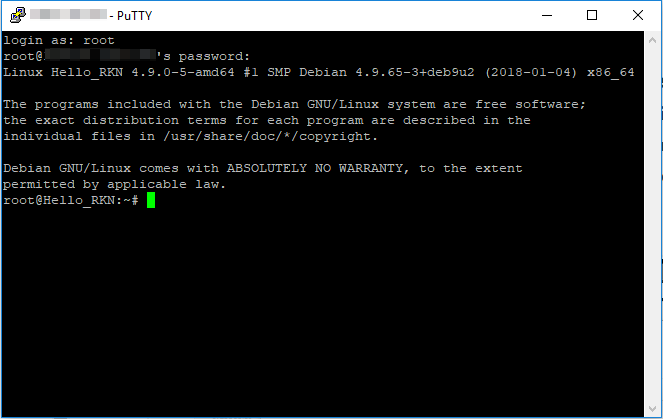
Subsequently execute the following commands in there (press Enter after each command):

apt-get update

The console should look somewhat like this:
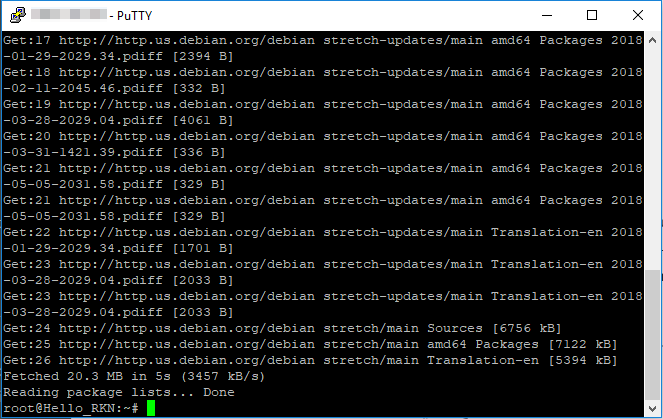
apt-get install curl -y

This is what you'll be seeing after executing this command:
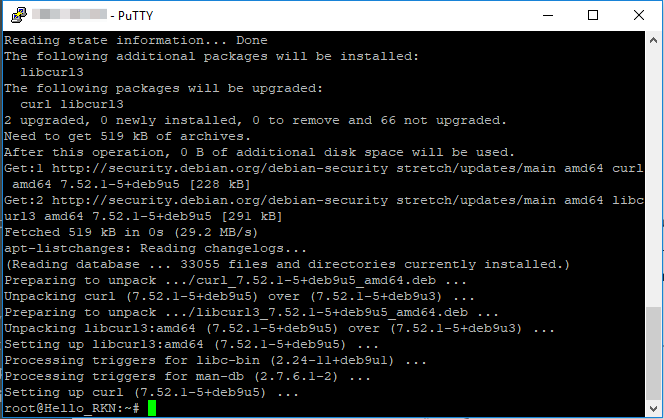
bash <(curl -s "https://raw.githubusercontent.com/AdguardTeam/ProxiesSetup/master/setup.sh")

At the 3rd step, the script will ask you for a username/password pair for your future proxy. You are free to choose any, but make sure to remember them, or even write them down. What it will look like:
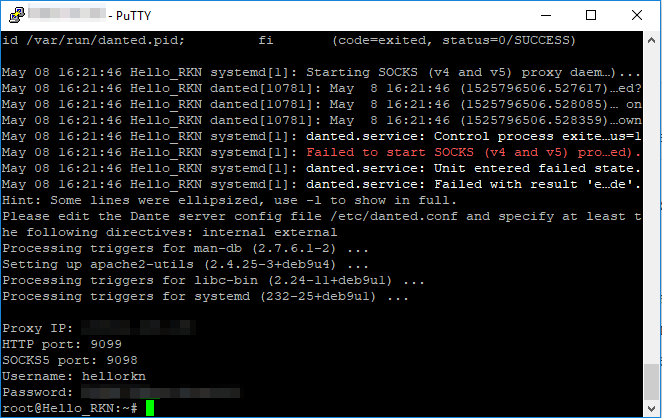
In the console, you will see the IP address of your proxy, HTTP port, SOCKS5 port, username and password. This information has to be entered whenever you want to configure your device/browser to use this proxy. Let's now have a look at a couple of specific examples.

Very important! SOCKS5 is not ideal in terms of security. Try not to use SOCKS5 proxy in public and unprotected networks. In one of the next articles, we'll tell about more secure solutions like Shadowsocks.

In case your server has restarted, you will need to reenable the danted service. To do so, run this command line in the console:

systemctl enable danted.service

Configuring proxy in AdGuard for Mac

Setting up a SOCKS5 proxy in AdGuard for Mac is pretty easy, especially since the proxy settings have been moved from the Advanced settings to the Network tab. Click the gear icon and select Preferences.
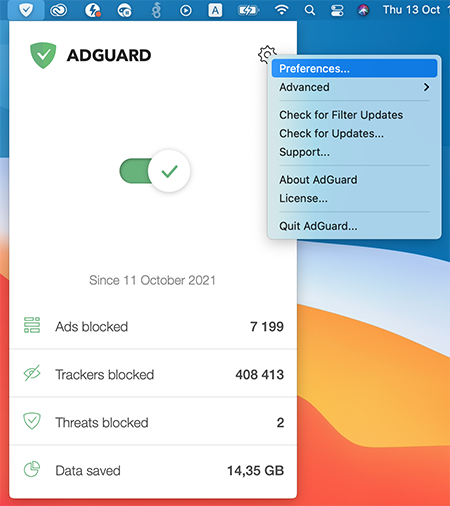
Settings_1

Now go to the Network tab, and then to the Outbound proxy tab. In the drop-down menu on the right, select SOCKS5. Fill in all the fields, using the data you have just seen in Terminal. To complete the setup, check the Outbound proxy box.
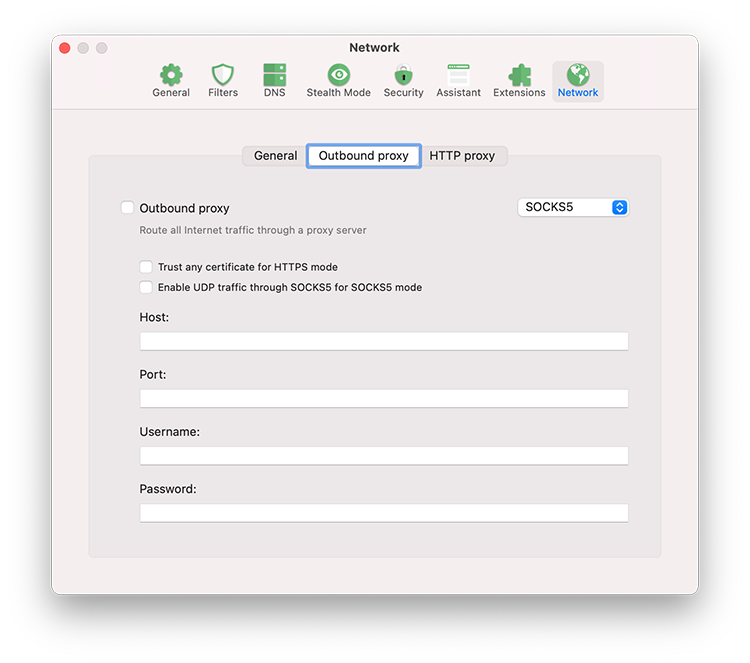
Settings_2

If you want to use AdGuard for Mac as an HTTP proxy to filter traffic on devices in your local network, go to the HTTP proxy tab and check the box Use AdGuard as an HTTP proxy.
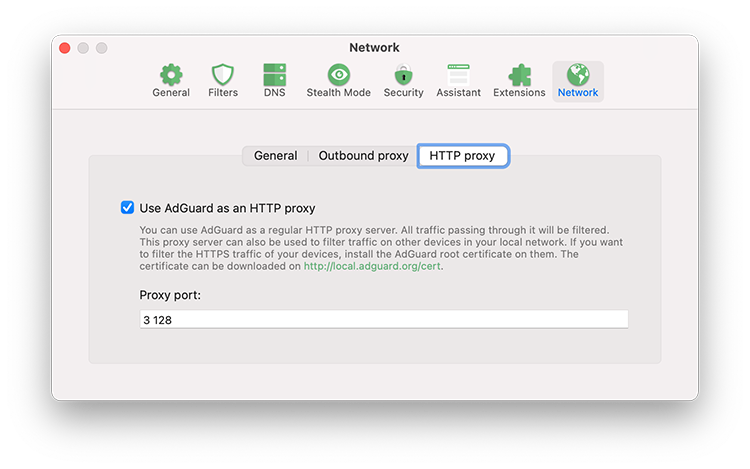
Settings_3

Configuring proxy in AdGuard for Android

There's no trickery here, we will be configuring our SOCKS5 proxy (since we need the authorization) just like we would configure any other proxy. Open the side menu of AdGuard app, go to "Settings - Proxy settings".
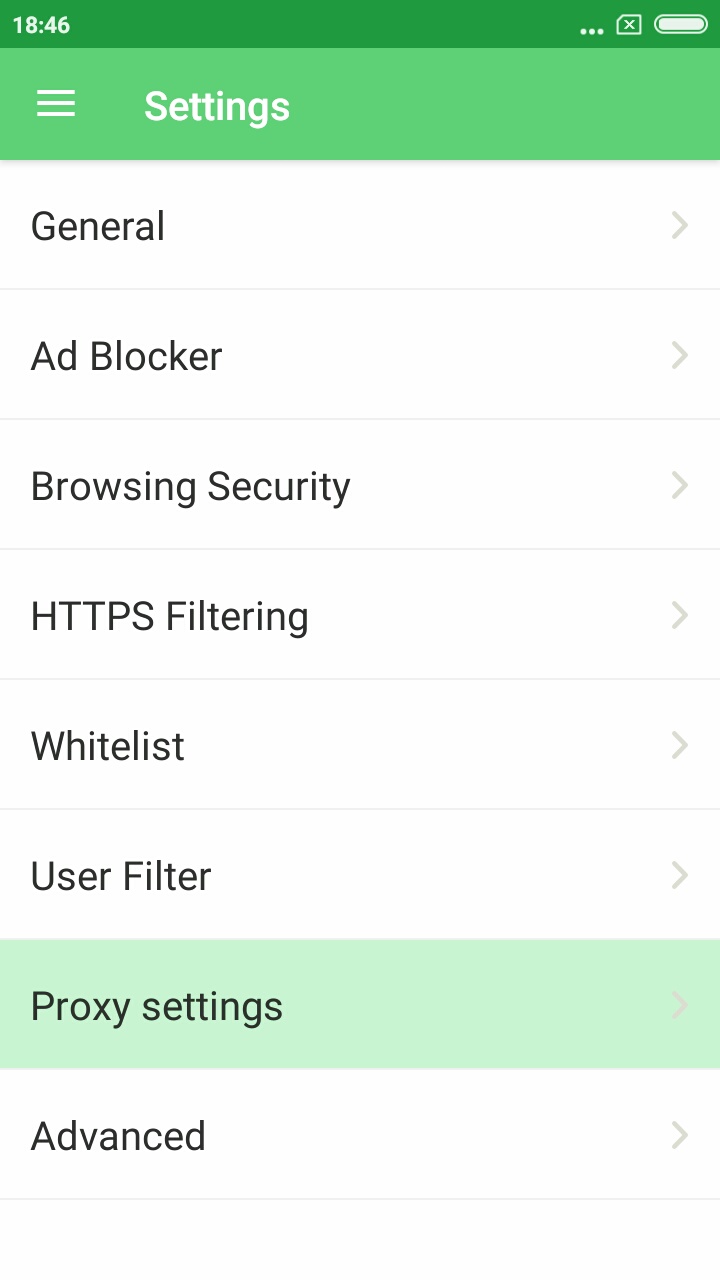
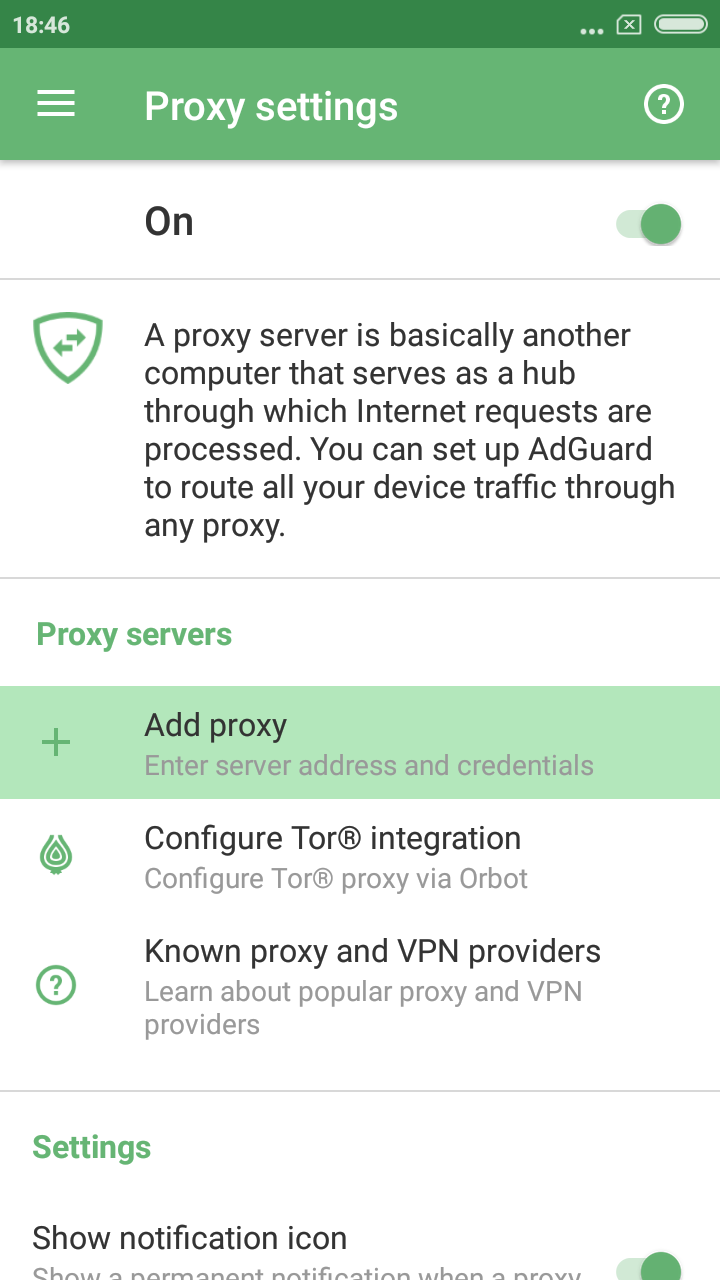
Don't forget to toggle the main switch in the top right corner on, then tap the "Add proxy" button.
Fill out all the fields using data from PuTTY console. You can enter anything under "Proxy name". Also, enable the "Default proxy" option if you plan to mainly use this proxy.
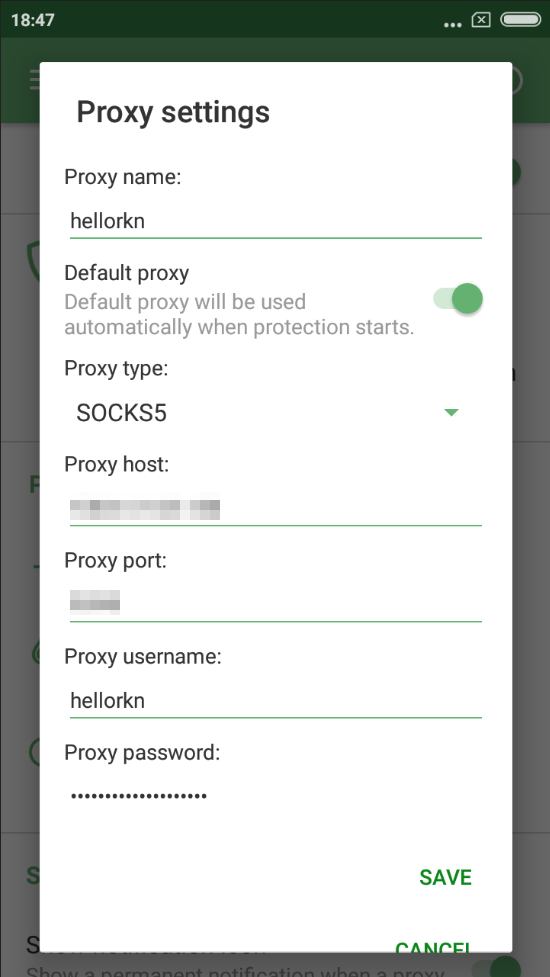
Excellent! Tap Save, now all traffic filtered by AdGuard will be routed through your proxy. And by the way, you can still disable AdGuard filtering for any app(s) via "Apps management", it will prevent its traffic from being routed through the proxy.
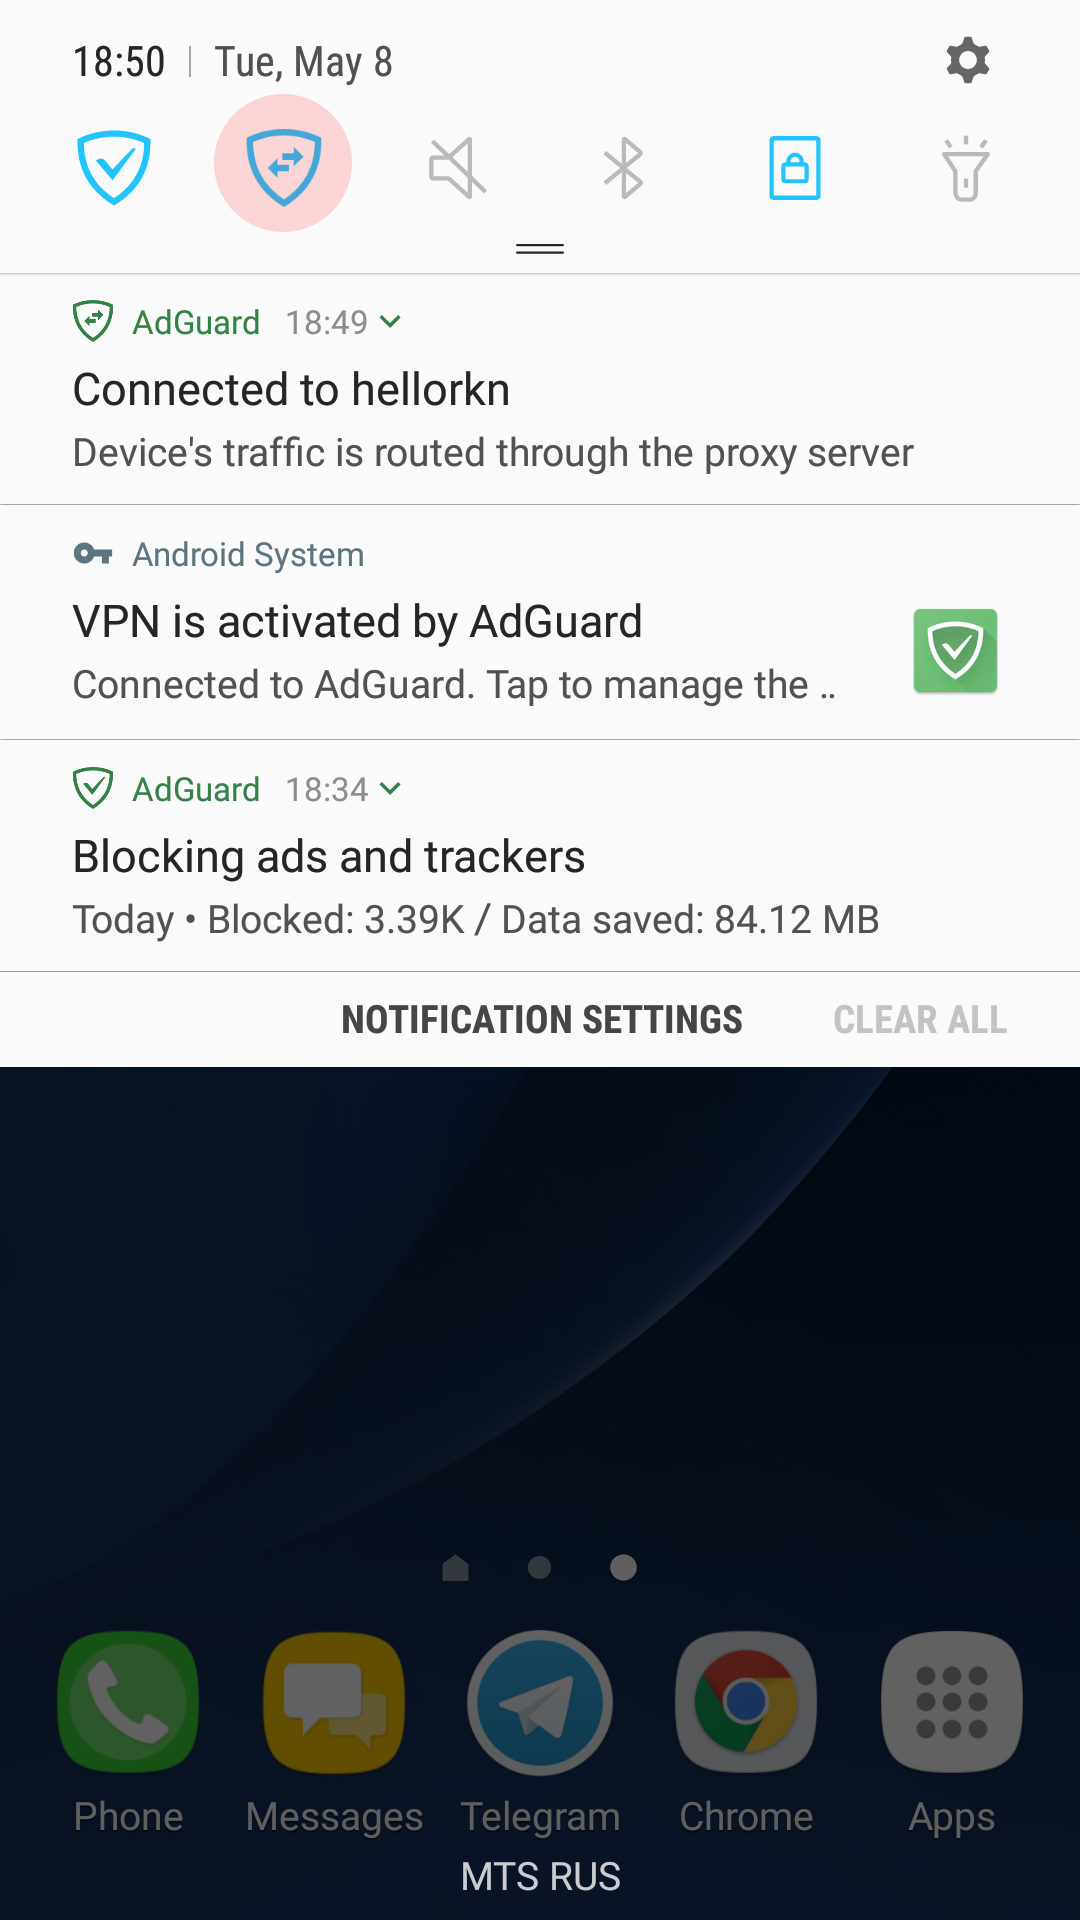
There's one trick that will allow you to instantly switch between enabling and disabling the proxy — you can add a specific tile to the quick access panel. Note there's a new notification in the notification bar, telling that your traffic is routed through the proxy server. Tapping on it will also take you to the "Proxy settings" screen in AdGuard.

Configuring proxy in Chrome/Firefox browsers

For this purpose, we advise using the SwitchyOmega browser extension. I use Chrome, so I'll be downloading it from the Chrome Store, Firefox users will find it among Firefox add-ons. Its unique trait is that it allows you to set up a proxy to be used on specific domains only, or, vice versa, to exclude specific domains.
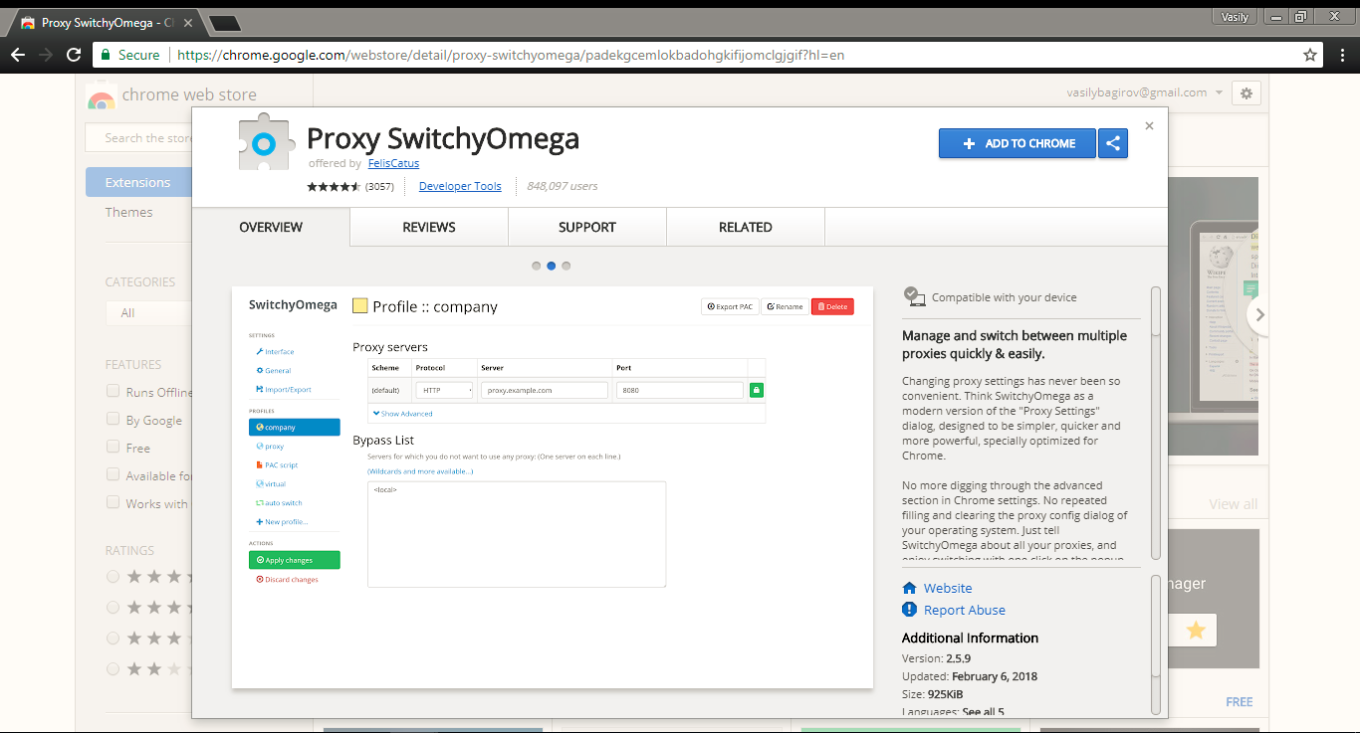
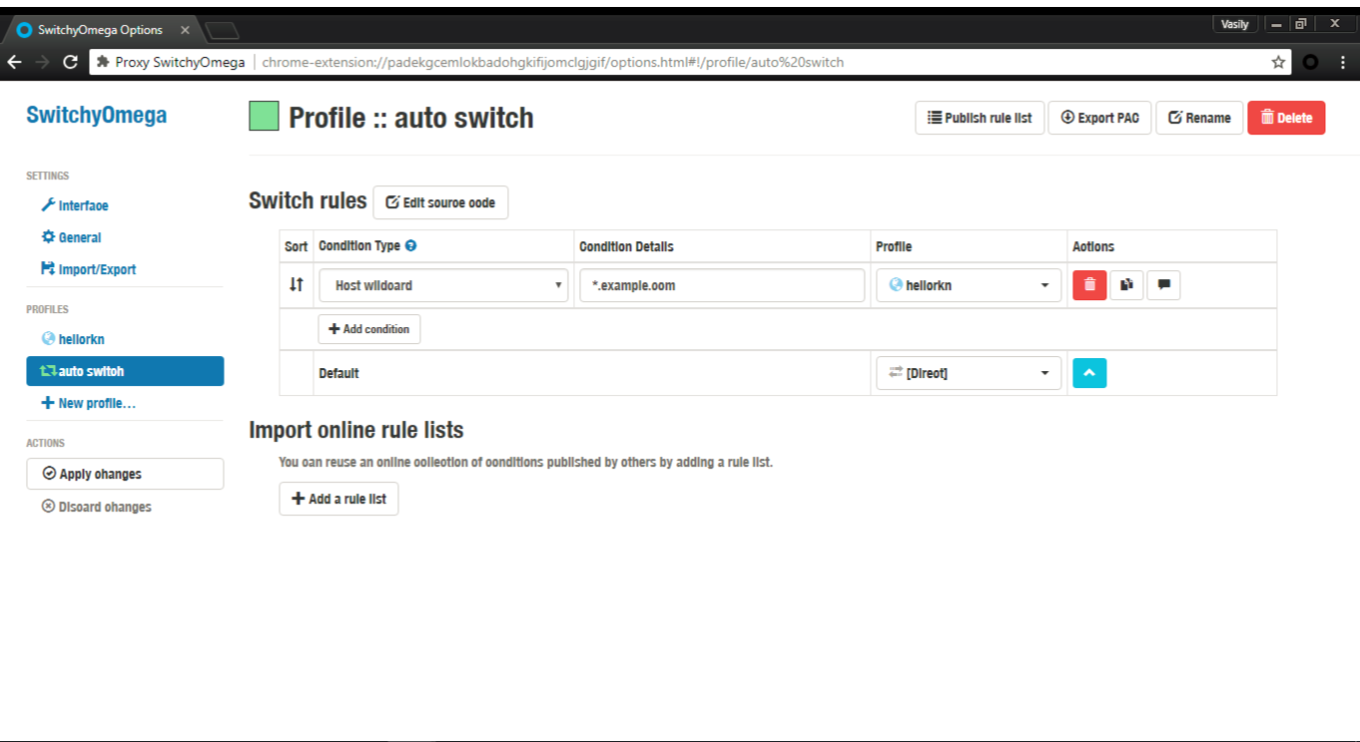
Configuring SwitchyOmega is very simple. Add a new profile ("+New profile") in the Profiles tab on the left. We need to choose HTTP protocol, since SOCKS5 does not support authorization here. Again, fill out the fields according to previously received information. Remember to apply changes by clicking the button on the left!

To make your browser use this proxy by default, in the "Auto switch" tab select the freshly added proxy in the Default drop-down menu.

In case you want your proxy to be used for specific websites or IP addresses only, set up respective switch rules. A tooltip will help you with the syntax.
And here's one small "lifehack" (please don't kill me for using this word): on any page you can quickly access proxy settings by clicking the SwitchyOmega extension icon. Manage proxy in respect to the current website, or change global proxy settings — everything is within a couple of clicks.
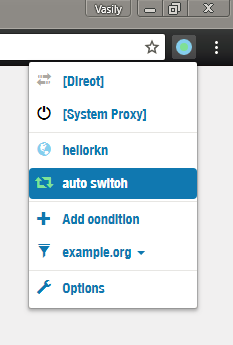
Color indicator also helps determining if the proxy is being used currently or not.

Summarizing

We've done it! If everything went according to plan, you should have your own server with a working proxy installed there, and respective settings on your phone/browser. Not so bad for 10 minutes spent on reading this article :)

Should you encounter any difficulties along the way, or if you just have any questions — let me know in the comments, and I (or some other team member) will help you get through! Good luck!


Svidela vam se ova objava?
AdGuard VPN AdGuard DNS AdGuard Mail AdGuard Wallet
Glavni ekran AdGuard za Windows
Ekran Zaštita u AdGuard za Windows, prikazuje funkcije zaštite i podešavanja
Ekran Statistika u AdGuard za Windows, prikazuje statistiku za blokirane oglase i trackere
Ekran Upravljanje aplikacijama u AdGuard za Windows, koji prikazuje opcije upravljanja zaštitom za aplikacije instalirane na uređaju
20.385 20385 recenzija
Odlično!
AdGuard — blokator reklama za Windows

AdGuard za Windows je više od blokatora oglasa. To je višenamenski alat koji blokira oglase, kontroliše pristup opasnim sajtovima, ubrzava učitavanje stranica i štiti decu od neprimerenog sadržaja
Preuzimanjem programa prihvate uslove licenčnog ugovora
Microsoft prodavnica
Preuzimanjem programa prihvate uslove licenčnog ugovora
AdGuard za Windows v.8.0, 14-dnevni probni period
Glavni ekran AdGuard za Mac
Ekran Stealth režima u AdGuard za Mac
20.385 20385 recenzija
Odlično!

AdGuard — blokator reklama za Mac

AdGuard za Mac je jedinstveni blokator oglasa dizajniran imajući u vidu macOS. Pored zaštite od dosadnih oglasa u pregledačima i aplikacijama, štiti vas od praćenja, fišinga i prevara
Preuzimanjem programa prihvate uslove licenčnog ugovora
Saznajte više
AdGuard za Mac v.2.19, 14-dnevni probni period
Glavni ekran AdGuard za Android
Ekran Zaštita od praćenja u AdGuard za Android
Ekran Upravljanje aplikacijama u AdGuard za Android, koji prikazuje opcije upravljanja zaštitom za aplikacije instalirane na uređaju
Ekran Statistika u AdGuard za Android, prikazuje statistiku za blokirane oglase i trackere
Glavni ekran privatnog pregledača AdGuard za Android
QR kod za preuzimanje AdGuard za Android
20.385 20385 recenzija
Odlično!

AdGuard — blokator reklama za Android

Blokira oglase i trackere u svim pregledačima, igrama i drugim aplikacijama. Štiti vašu privatnost i omogućava vam da kontrolišete kako vaše aplikacije koriste Internet. Instalira se putem APK-a
Preuzimanjem programa prihvate uslove licenčnog ugovora
Saznajte više
Skeniranje za preuzimanje
Korišćenje bilo kog QR-kod čitača dostupnog na uređaju
AdGuard za Android v.4.14, 14-dnevni probni period
Glavni ekran AdGuard za iOS
Ekran Zaštita u AdGuard za iOS, prikazuje funkcije zaštite i podešavanja
Ekran Statistika u AdGuard za iOS, prikazuje statistiku za blokirane oglase i trackere
QR kod za preuzimanje AdGuard za iOS
20.385 20385 recenzija
Odlično!

AdGuard — blokator reklama za iOS

Najbolji iOS blokator oglasa za iPhone i iPad. AdGuard uklanja sve vrste oglasa i trackera u Safariju i štiti vašu privatnost u svim aplikacijama na DNS nivou
Preuzimanjem programa prihvate uslove licenčnog ugovora
Saznajte više
Skeniranje za preuzimanje
Korišćenje bilo kog QR-kod čitača dostupnog na uređaju
AdGuard za iOS v.4.5
Glavni ekran AdGuard Content Blocker
Ekran filtera u AdGuard Content Blocker
Ekran podešavanja u AdGuard Content Blocker
20.385 20385 recenzija
Odlično!

AdGuard blokator sadržaja

AdGuard Content Blocker eliminiše sve vrste reklama u mobilnim pregledačima koji podržavaju tehnologiju blokiranja sadržaja – kao što su Samsung Internet i Yandex Browser. Njegove funkcije su ograničene u odnosu na AdGuard za Android, ali je besplatan, lako se instalira i efikasan je
Preuzimanjem programa prihvate uslove licenčnog ugovora
Saznajte više
AdGuard blokator sadržaja v.2.8
Glavni ekran AdGuard Browser Extension
Ekran Zaštita od praćenja u AdGuard Browser Extension
20.385 20385 recenzija
Odlično!

AdGuard proširenje za preglednike

AdGuard je najbrže i najlakše proširenje za blokiranje reklama koje uspešno blokira sve vrste reklama na svim veb stranicama! Izaberite AdGuard za preglednik koji koristite i uživajte u surfovanju bez reklama, koje će postati sigurno i brzo.
Instaliraj
Preuzimanjem programa prihvate uslove licenčnog ugovora
Instaliraj
Preuzimanjem programa prihvate uslove licenčnog ugovora
Instaliraj
Preuzimanjem programa prihvate uslove licenčnog ugovora
Instaliraj
Preuzimanjem programa prihvate uslove licenčnog ugovora
Instaliraj
Preuzimanjem programa prihvate uslove licenčnog ugovora
Saznajte više
Instaliraj
Preuzimanjem programa prihvate uslove licenčnog ugovora
Saznajte više
AdGuard proširenje za preglednike v.5.5
Glavni ekran AdGuard Assistant
20.385 20385 recenzija
Odlično!

AdGuard pomoćnik

Dodatak pregledača za prateće AdGuard desktop aplikacije. Omogućava vam da blokirate prilagođene stavke na vebsajtovima, dodate vebsajtove na listu dozvoljenih i šaljete izveštaje direktno iz pregledača
AdGuard pomoćnik v.1.4
20.385 20385 recenzija
Odlično!

AdGuard Home

AdGuard Home je mrežno rešenje za blokiranje oglasa i tragača. Instalirajte ga jednom na ruteru da biste pokrili sve uređaje na vašoj kućnoj mreži — nije potreban dodatni klijentski softver. Ovo je posebno važno za različite IoT uređaje koji često predstavljaju pretnju vašoj privatnosti
AdGuard Home v.0.107
Glavni ekran AdGuard Pro za iOS
Ekran zaštite u AdGuard Pro za iOS, koji prikazuje funkcije zaštite i podešavanja
Ekran statistike u AdGuard Pro za iOS, koji prikazuje statistiku za blokirane oglase i tragače
20.385 20385 recenzija
Odlično!

AdGuard Pro za iOS

AdGuard Pro za iOS dolazi sa svim naprednim funkcijama zaštite od blokiranja oglasa. Nudi iste alate kao i plaćena verzija AdGuard-a za iOS. Ističe se u blokiranju oglasa u Safariju i omogućava vam da prilagodite DNS postavke kako biste prilagodili svoju zaštitu. Blokira oglase u pretraživačima i aplikacijama, štiti vašu decu od neprikladnog sadržaja i čuva vaše lične podatke na sigurnom
Preuzimanjem programa prihvate uslove licenčnog ugovora
Saznajte više
AdGuard Pro za iOS v.4.5
Glavni ekran AdGuard Mini za Mac
Ekran zaštite za Safari u AdGuard Mini za Mac
Ekran Kreiranje pravila u AdGuard Mini za Mac
20.385 20385 recenzija
Odlično!

AdGuard Mini za Mac — Safari blokator oglasa

AdGuard Mini za Mac je moćan Safari blokator adova. Ova lagana aplikacija uklanja reklame, blokira praćenike i ubrzava učitavanje stranica. Pomaže vam da pretražujete veb u Safariju bez ometanja i da sačuvate svoje podatke privatnim
Instaliraj
Preuzimanjem programa prihvate uslove licenčnog ugovora
Saznajte više
AdGuard Mini za Mac v.2.3
Glavni ekran AdGuard za Android TV sa uključenom zaštitom
Ekran Blokiranje oglasa u AdGuard za Android TV, prikazuje njegove funkcije i podešavanja
Ekran Podešavanja u AdGuard za Android TV
Ekran Upravljanje aplikacijama u AdGuard za Android TV, prikazuje aplikacije gde su oglasi i trackeri blokirani
20.385 20385 recenzija
Odlično!

AdGuard za Android TV

AdGuard za Android TV je jedina aplikacija koja blokira oglase, čuva vašu privatnost i deluje kao zaštitni zid za vaš Smart TV. Dobijajte upozorenja o Veb pretnjama, koristite bezbedni DNS i koristite šifrovani saobraćaj. Opustite se i zaronite u omiljene serije sa vrhunskim obezbeđenjem i nula oglasa!
AdGuard za Android TV v.4.14, 14-dnevni probni period
Maskota AdGuard, Agnar, drži Linux pingvina
20.385 20385 recenzija
Odlično!

AdGuard za Linux

AdGuard za Linuk je prvi sistemski bloker oglasa na svetu. Blokirajte oglase i tragače na nivou uređaja, izaberite unapred instalirane filtere ili dodajte sopstvene — sve kroz interfejs komandne linije
AdGuard za Linux v.1.4
20.385 20385 recenzija
Odlično!

AdGuard Temp Mail

Besplatan generator privremenih email adresa koji vas čuva anonimnim i štiti vašu privatnost. Nema spama u vašem glavnom sandučetu!
20.385 20385 recenzija
Odlično!

AdGuard VPN

75 lokacija širom sveta

Pristup bilo kom sadržaju

Jako šifrovanje

Nema prikupljanja dnevnika

Najbrža veza

24/7 podrška

Probajte besplatno
Preuzimanjem programa prihvate uslove licenčnog ugovora
Saznajte više
20.385 20385 recenzija
Odlično!

AdGuard DNS

AdGuard DNS je alternativno rešenje za blokiranje reklama, zaštitu privatnosti i roditeljsku kontrolu. Lako se postavlja i besplatan je za korišćenje. On obezbeđuje neophodni minimum zaštite od reklama na mreži, praćenja i fišinga, bez obzira koju platformu i uređaj koristite.
20.385 20385 recenzija
Odlično!

AdGuard Mail

Zaštitite svoj identitet, izbegnite spam i održite bezbednost svog sandučeta uz naše alias-e i privremene e-adrese. Uživajte u našoj besplatnoj usluzi prosleđivanja emaila i aplikacijama za sve operativne sisteme.
20.385 20385 recenzija
Odlično!

AdGuard Wallet

Bezbedan i privatan kripto novčanik koji vam daje potpunu kontrolu nad vašom imovinom. Upravljajte više novčanika i otkrijte hiljade kriptovaluta za čuvanje, slanje i razmenu
Preuzimanje AdGuard Da biste instalirali AdGuard, kliknite na datoteku označenu strelicom Izaberite „Otvori“ i kliknite na „U redu“, a zatim sačekajte da se datoteka preuzme. U otvorenom prozoru prevucite ikonu AdGuard u fasciklu „Aplikacije“. Hvala vam što ste izabrali AdGuard! Izaberite „Otvori“ i kliknite na „U redu“, a zatim sačekajte da se datoteka preuzme. U otvorenom prozoru kliknite na „Instaliraj“. Hvala vam što ste izabrali AdGuard!
Instalirajte AdGuard na svoj mobilni uređaj