Installazione manuale del certificato di sicurezza nel browser di Firefox
Questo articolo riguarda AdGuard per Android, un ad blocker multifunzionale che protegge il tuo dispositivo a livello di sistema. Per vedere come funziona, scarica l'app di AdGuard
Affinché AdGuard filtri correttamente il traffico HTTPS su Firefox, il browser deve fidarsi del certificato di AdGuard. Ciò può essere ottenuto in modi diversi per diverse versioni di Firefox.
Metodo 1
Questo metodo funziona sulle versioni 90.0 e successive di Firefox per Android.
Per far sì che Firefox si fidi del certificato di AdGuard, fai quanto segue:
Apri il browser.
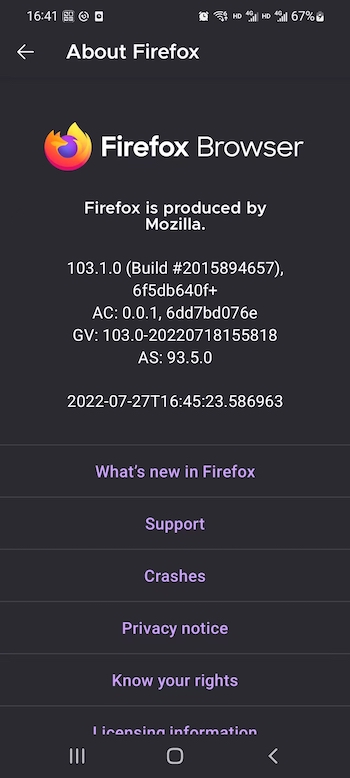
Vai in Impostazioni → Informazioni su Firefox.

Tocca cinque volte il logo di Firefox.
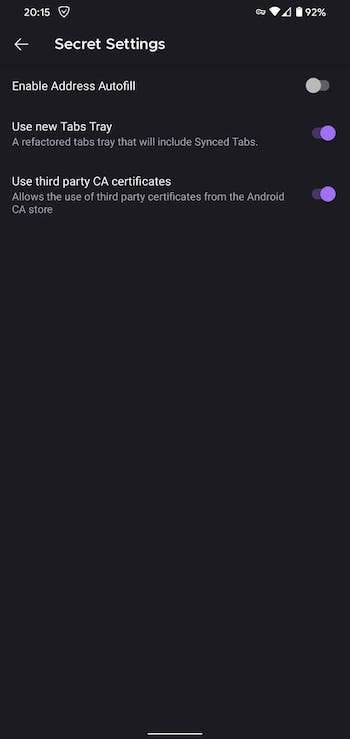
Naviga in Impostazioni → Impostazioni Segrete.

Attiva Utilizza certificati CA di terze parti.
Metodo 2
Questo metodo funzionerà soltanto sui dispositivi con permessi di root.
Installa e configura ADB; Sulla piattaforma Windows, i proprietarii di Samsung potrebbero dover installare questa utility.
Attiva la modalità sviluppatore e abilita il Debug USB:
- Apri l'app delle Impostazioni sul tuo telefono;
- Vai alla sezione Sistema (ultima voce nel menu delle impostazioni). In questa sezione, trova Informazioni sul telefono;
- Tocca la riga Numero di build per 7 volte. Dopodiché, riceverai la notifica "Sei ora uno sviluppatore" (Se necessario, inserisci un codice di sblocco per il dispositivo);
- Apri le Impostazioni di sistema → Opzioni per sviluppatori → Scorri in basso e abilita Debug USB → Conferma che il debug sia abilitato nella finestra Consenti debug USB, dopo aver letto attentamente l'avviso.
Installa il browser Firefox (versione di rilascio);
Apri le impostazioni di AdGuard (icona dell'ingranaggio in basso a destra) → Filtraggio → Rete → Filtraggio HTTPS → Certificato di sicurezza → Istruzioni per Firefox → Installa per versioni precedenti;
Apri la cartella
data/data/org.mozilla.firefox/files/mozillautilizzandoadb shell suecd data/data/..., quindi naviga alla cartella denominataxxxxxxx.defaulte memorizzane il nome;Nella cartella specificata, siamo interessati a due file:
cert9.dbkey4.db
Dobbiamo spostarli in una cartella del browser dove si è verificato il problema con il certificato di sicurezza:
data/data/org.mozilla.<browser_name>/files/mozilla/yyyyyy.default.
Il comando completo è simile al seguente:
adb shell sucp -R data/data/org.mozilla.firefox/files/mozilla/xxxxxxxxxx.default/cert9.db data/data/org.mozilla.<browser_name>/files/mozilla/yyyyyyyyyy.defaultcp -R data/data/org.mozilla.firefox/files/mozilla/xxxxxxxxxx.default/key4.db data/data/org.mozilla.<browser_name>/files/mozilla/yyyyyyyyyy.default
Nel caso in cui tu abbia ricevuto la notifica di sistema autorizzazione negata, dovresti prima spostare i file specificati alla cartella priva di autorizzazioni. Dopodiché, dovresti spostarli alla cartella necessaria, nel tuo browser Firefox.
Il comando completo dovrebbe somigliare a questo:
adb shell sucp -R data/data/org.mozilla.firefox/files/mozilla/xxxxxxxx.default/cert9.db sdcard/Downloadcp -R data/data/org.mozilla.firefox/files/mozilla/xxxxxxxxx.default/key4.db sdcard/Downloadcp -R sdcard/Download/cert9.db data/data/org.mozilla.<browser_name>/files/mozilla/yyyyyyyyyy.defaultcp -R sdcard/Download/key4.db data/data/org.mozilla.<browser_name>/files/mozilla/yyyyyyyyyy.default
Se
adb shell sunon funziona, dovresti provare inizialmente conadb shell, quindi consu.