Firefox 브라우저의 인증서 신뢰 문제
:::정보
This article is about AdGuard for Android, a multifunctional ad blocker that protects your device at the system level. To see how it works, download the AdGuard app
:::
AdGuard가 Firefox에서 HTTPS 트래픽을 성공적으로 필터링하기 위해서는 브라우저가 AdGuard의 인증서를 신뢰해야 합니다. Firefox 버전에 따라 브라우저가 인증서를 신뢰하도록 하는 방법은 다릅니다.
방법 1
이 방법은 Firefox Nightly 90.0a1 이상 버전에서만 사용될 수 있습니다. Firefox의 베타 및 일반 버전이 v90에 도달하면 이 방법을 해당 버전에도 적용할 수 있습니다.
Firefox Nightly가 AdGuard 인증서를 신뢰하도록 하려면 다음 단계를 따르십시오.
Run the browser.
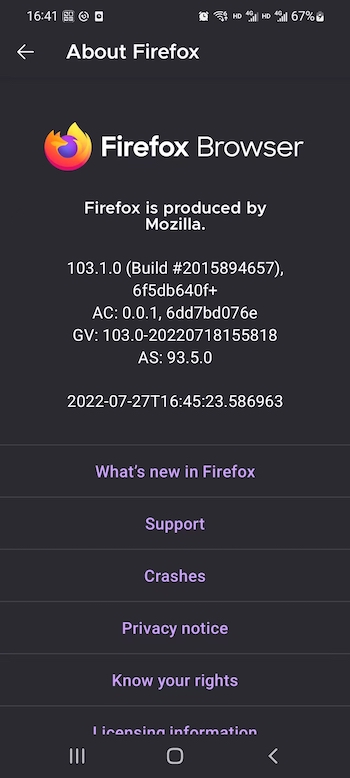
Go to Settings → About Firefox.

Tap the Firefox logo five times.
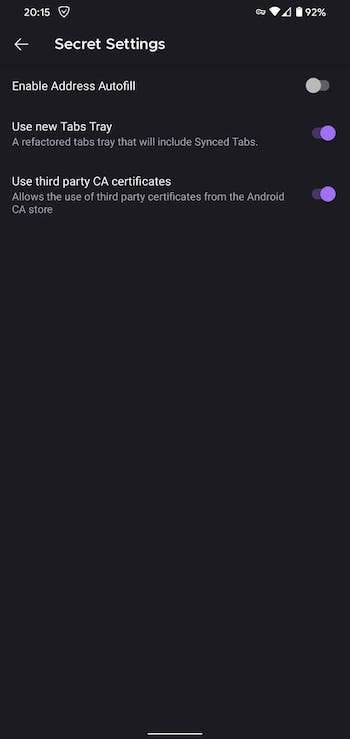
Navigate to Settings → Secret Settings.

Toggle Use third party CA certificates.
방법 2
This method will only work on rooted devices.
Install and configure ADB; On the Windows platform, Samsung owners may need to install this utility.
Activate the developer mode and enable USB debugging:
- Open the Settings app on your phone;
- Go to System section (last item in the settings menu). In this section, find the sub-item About phone;
- Tap the Build number line 7 times. After that, you will receive a notification that You are now a developer (If necessary, enter an unlock code for the device);
- Open System Settings → Developer Options → Scroll down and enable USB debugging → Confirm debugging is enabled in the window Allow USB debugging after reading the warning carefully.
Install the Firefox browser (release version);
Open the AdGuard settings (gear icon in the bottom right corner) → Filtering → Network → HTTPS filtering → Security certificate → Instructions for Firefox → Install for old versions;
Open the folder
data/data/org.mozilla.firefox/files/mozillausingadb shell suandcd data/data/..., then browse to the folder namedxxxxxxx.defaultand memorize its name;In the specified folder we are interested in two files:
cert9.dbkey4.db
We need to move these files to a folder of the browser where the security certificate issue occurred:
data/data/org.mozilla.<browser_name>/files/mozilla/yyyyyy.default.
The full command will look like this:
adb shell sucp -R data/data/org.mozilla.firefox/files/mozilla/xxxxxxxxxx.default/cert9.db data/data/org.mozilla.<browser_name>/files/mozilla/yyyyyyyyyy.defaultcp -R data/data/org.mozilla.firefox/files/mozilla/xxxxxxxxxx.default/key4.db data/data/org.mozilla.<browser_name>/files/mozilla/yyyyyyyyyy.default
In case you received the system notification permission denied, you should first move the specified files to the permission-free directory. And after that you should move them to the necessary folder in your Firefox browser.
The full command should look something like this:
adb shell sucp -R data/data/org.mozilla.firefox/files/mozilla/xxxxxxxx.default/cert9.db sdcard/Downloadcp -R data/data/org.mozilla.firefox/files/mozilla/xxxxxxxxx.default/key4.db sdcard/Downloadcp -R sdcard/Download/cert9.db data/data/org.mozilla.<browser_name>/files/mozilla/yyyyyyyyyy.defaultcp -R sdcard/Download/key4.db data/data/org.mozilla.<browser_name>/files/mozilla/yyyyyyyyyy.default
If
adb shell sudoes not work, you should tryadb shellinitially, and thensu.